Creating DLC Mods
This guide will show you how to unpack DLC for editing, and how to create a new DLC mod as well as how to package and distribute it. By using Mod Manager you can signifciantly shorten the time required to setup and deploy your mod so can spend more time focusing on actual mod development. Nobody enjoys doing monotonous boring work that could easily be automated. You may see the terms 'DLC mod' and 'Custom DLC' used interchangably, these refer to the same concept of an unofficial DLC.
Here are the tools you will need to follow this guide.
You should understand the concepts in the Simple Modding Guide fairly well before attempting this guide as I will not be covering much coalesced editing here.
Table of Contents
- DLC in the Mass Effect trilogy
- Creating a DLC mod
- Unpacking DLC with Mod Manager
- DLC Coalesced value types
- DLC mods: Required files
- Deploying your mod
DLC in the Mass Effect trilogy
DLC for Mass Effect games are stored in different ways for each game. For Mass Effect and Mass Effect 2, DLC is simply another directory in the game, /DLC and /BioGame/DLC respectively. Under each folder is essentially the same folder structure as the basegame, with CookedPC(Console) and the like.
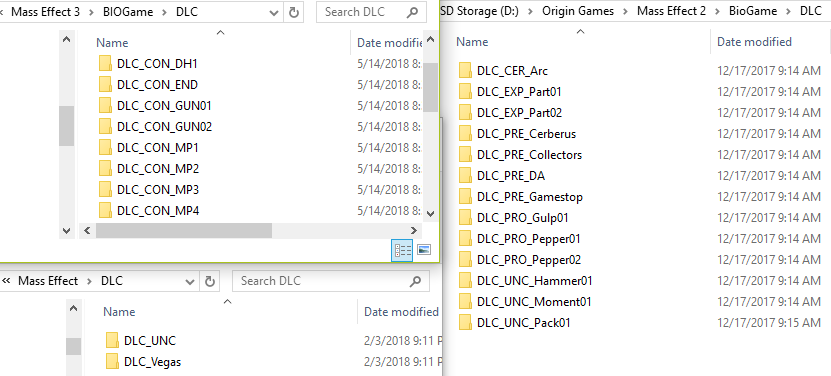
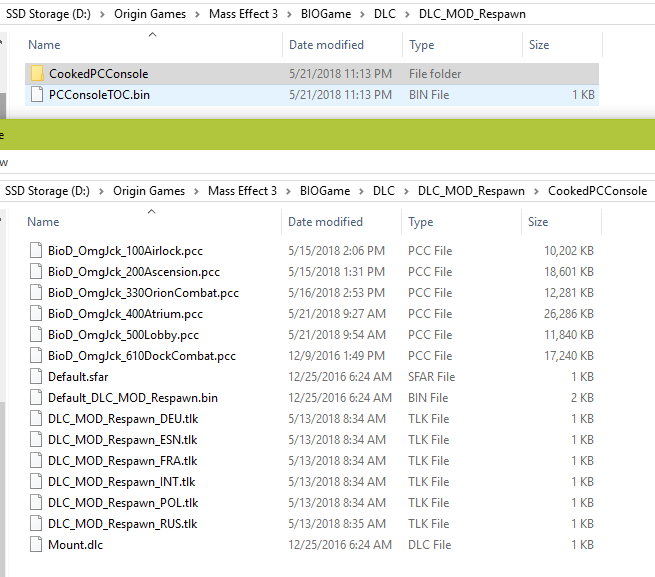
Mass Effect 3 DLC is similar, but instead of individual files being compressed, files are essentially zipped up in a proprietary archive format, called SFAR. This is backwards for RAFS, or Random Access File System. This isn't the official name, as there is no stated one, but it makes sense given what the archive file does for the game. For the remainder of this guide (and in the modding scene) they are referred to as SFAR. You can find technical information on this file format on the ME3Explorer Wiki page for SFAR. SFAR files in the DLC directory are always named Default.sfar, while the TESTPATCH one is Patch_001.sfar. I talk about TESTPATCH in the TESTPATCH reference guide.

ME3 also supports the ME2 style of folder structure, which is how DLC mods are shipped. As before, it looks very similar to the folder structure under the BIOGame directory.
Mass Effect and Mass Effect 2 will load DLC from any folder directly under the DLC folder for the game. Mass Effect 3 will only look at folders that start with DLC_. For this reason, DLC cannot be disabled in Mass Effect or Mass Effect 2 without moving the DLC out of the DLC directory (which is why this not supported in Mod Manager).
Essentially mod developers create an unpacked DLC, which the end user installs into their DLC folder. The game loads it when loading into Singleplayer or Multiplayer, depending on information in the Mount.dlc file. We will talk about Mount.dlc files later in this guide.
Before we begin this guide you should make sure you have a backup of your game before you unpack DLC. You can create a backup in the Backup & Restore menu in Mod Manager. A backup will save you a lot of headache when you accidentally modify or delete a file and don't want to have Origin repair your entire installation. You should use a file versioning system on your modding workspace, such as File History, scheduled backups, cloud storage sync, etc. on a very frequent basis to avoid losing a lot of work and time if something goes wrong. Many modders have learned this the hard way!
Personally, I use File history on a 15 minute schedule to my NAS drive, along with manual checkpoints and weekly ones on my Google Drive.
Creating a DLC mod
Creating a DLC mod in the past used to be annoying and time consuming, but with Mod Manager it's a matter of filling out a few fields in Starter Kit. Starter Kit allows you to generate a blank, working mod for all languages that you can literally press Apply Mod on and have the game load it. Since it's blank, it won't do anything, but you can start adding files right away.
Custom DLC mods: SP vs MP
Singleplayer mods are perfectly fine to package as DLC mods - assuming they are actual content changes and not just texture changes. If you are creating a mod that is exclusively a texture change, you can use .mem or .tpf files and they can be installed by ALOT Installer's 'Free Mode', which doesn't require installation of ALOT.
Multiplayer mods are a different story. You cannot just add a DLC to MP and expect it to work - matchmaking, even for private games, require all players to have the exact same set of loaded MP DLC. Players with different sets will never matchmake to each other, which means if you add an MP DLC, you will be effectively segmented off from the main playerbase. This can work in your favor in theory as it will make sure nobody without the mod joins, but in reality it means private only games because of some interesting issues with networking in Unreal Engine 3 and modding.
For this reason, all files must be modified in-place for MP modding unless it is truely new content. I have never come across a content mod for MP besides my Rejection and Redemption DLC, the rest are modified in-place. All ModMaker edits are done in-place. This ensures other players don't have to have the mod installed (in most cases, not always), but makes installation more tedious - a big reason why I made Mod Manager in the first place.
The Mount.dlc file has a flag that indicates when to load a DLC - MP, SP, or both, as well as a few options like requiring the DLC in the save. Make sure if you are making an SP mod you never choose an option with MP in it or it will break end users ability to play MP.
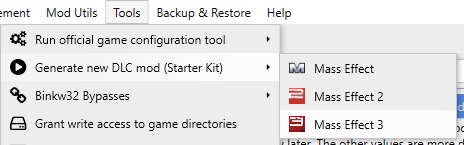
Using Starter Kit
For this tutorial we will be doing some SP modding, so we will be using a Custom DLC. To start using Starter Kit, go to Tools > Mod Development > Generate new DLC mod (Starter Kit) > Select your game. For this tutorial we will be doing Mass Effect 3.
Starter kit will ask you to fill out some fields about your mod. Changing these values later is annoying, so make sure you choose your values wisely. For mount priority values, you should choose an unused value under 4800 (but greater than 3300) from information on the DLC mod telemetry database. It is vital that you pick an unused one as if you collide with another the game will have undefined behavior. For the TLK ID, you can for the most part pick a random (keyword, random) number between 1 billion and 2 billion.
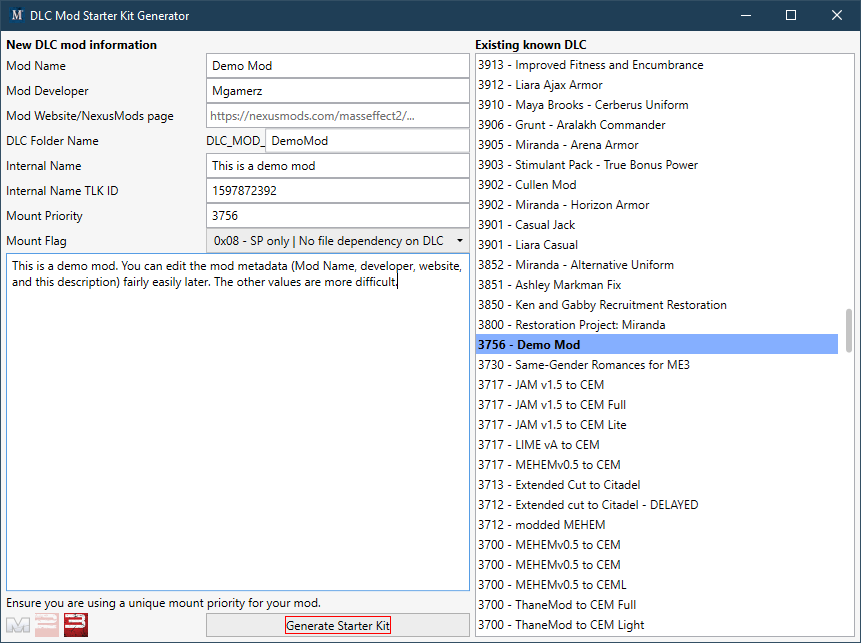
You can hover your mouse over the fields for information on what each of them is. You can do this for almost everything in Mod Manager and my software. Your mod folder name will always start with DLC_MOD_ - I enforce this because end-users who are looking in the DLC folder will be able to easily identify that the DLC is a mod.
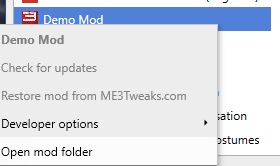
Press Generate Starter Kit and your DLC mod will be created. Mod Manager will reload mods and highlight your new mod for you. You can right click your mod and select 'Open mod folder' to see the library version of your mod.
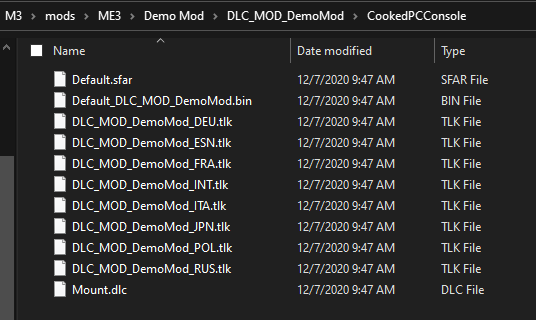
The generated files will be in the DLC_MOD_[NAME] that you selected.
You can edit the Default_DLC_MOD_[NAME].bin coalesced file by dragging and dropping it onto Mod Manager's interface to decompile it. You can recompile the file by dragging the subfolder's DefaultDLC_MOD_[NAME].xml back onto Mod Manager. You do the same with the TLK files. Very easy, very quick.
You can now start replacing files in your DLC_MOD_[name]. You can press Apply Mod in Mod Manager to install the mod, however if you add or remove files make sure you reload mods by clicking the refresh button at the top of the mod library.
Unpacking DLC
Extracting items from DLC used to be a pretty awful process. Over the years since I wrote the original version of this guide, it has become far, far easier, and multiple times faster. What used to take hours now takes minutes, thanks to Aquadran's work on MassEffectModder. We can unpack specific DLC quickly and easily using ME3Explorer - ME3Tweaks Fork's DLC Unpacker. It is very easy to use, so I won't detail it here. You can run ME3Explorer - ME3Tweaks Fork from the Tools menu of Mod Manager. Open DLC Unpacker and unpack the DLC. It may be useful to make a copy of the game once DLC has been unpacked.
After unpacking DLC, you will see the official DLC folders have lots of extra files in them.
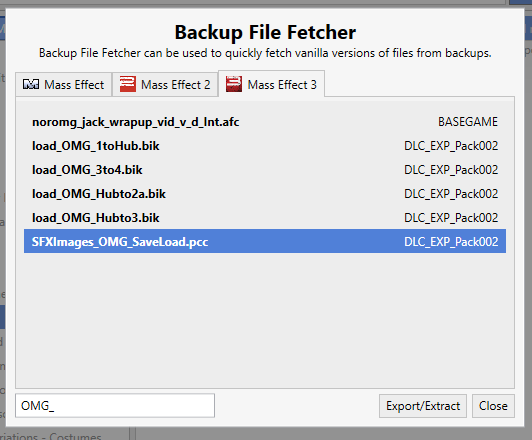
You can also use Mod Manager's Backup File Fetcher, also in the Tools menu, to fetch files out of DLC (and basegame), even when still packed. This makes it easy it get a vanilla copy of a file if you need it.
When building your mod, you will almost always take one of these files (or a basegame one) and modify it, and put it into your mod.
DLC Coalesced value types
Coalesced values are assigned a data type integer, with a value between 0 and 4 inclusively. These are visible only in Gibbed (type 2) and TankMaster's (all types) decompilers. You will not see any data types in Wenchy's editor, and Gibbed's DLC decompiler does not support all data types, which is why I only recommend using the one in Mod Manager, which is TankMaster's. Mod Manager, as far as I am aware, has the only version of TankMaster's compiler that has some bug fixes for very rare and erratic serialization bugs that I had Tankmaster fix back in 2014 when I was building ModMaker.
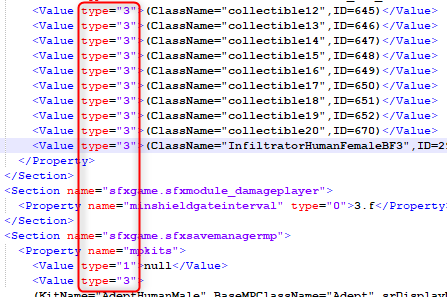
For the most part, coalesced types in the basegame coalesced are type 2 only, mainly because there is nothing to override. Once you go into DLC you will see many other types, described as follows.
| Int | Type | Meaning |
|---|---|---|
| 0 | Assign or override | This will assign a value if it does not exist, or overwrite it if it does. This data type is not used for lists. |
| 1 | Clear | This will clear out any assigned value(s) for a type. In the game this is only used to clear lists, and the decompiler will show a value of NULL. Assigning a value of 1 at the top of a property will clear the list, which you can use to completely remove entries that have already been parsed from a lower priority. |
| 2 | Assign or add | The same as type 0, for most purposes. This will add an entry to a list, even if the list already contains that value. This type can be used for lists, but is not recommended unless duplicates are expected. |
| 3 | Assign or add (only if unique) | This will create or add an element to an existing array property if it is unique. That is, the text must be different, case sensitive. This type is used almost exclusively in DLC for both lists and normal values. |
| 4 | Subtract (exact match) | Removes an element from the list with the EXACT match on the value. This is case sensitive and will fail on whitespace, such as tabs or \t values. For this reason it is important that users do not modify the original value you are subtracting, even if it is not contained in your mod. |
These types are fairly close to standard Unreal Engine 3's configuration file declaration, with the only noticable change being that ME3 has Clear and Assign or override, and UE3 has Remove (by propertyname) without a match.
Lists in coalesced are read from top to bottom. As such, if you are replacing an item in a list, you must do a type 4 with the exact value (that will be previously read - this can get complicated!) followed by a type 3. If you are trying to maintain an ordered list you will have to wipe out the list and rebuild it - there is no support for replacement. You can use type 1 at the top of a list to clear it, or if there are multiple items you need to clear, you might do multiple type 4's - if the item is not found, it is simply skipped.
Required files for DLC
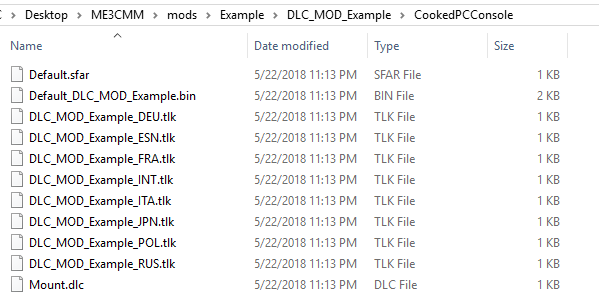
In each DLC there are a set of required files to make the DLC work. If any of these files are missing, the DLC will say it is corrupt at the main menu, or may not work with the user's language. These are all located in the Default.sfar file, but for the sake of modding they will always be outside of the SFAR. Starter kit automatically generates all of these files for you.
| Filename | Purpose |
|---|---|
| Default.sfar | The game will always look for this file, always. A properly unpacked SFAR is 32 bytes in size, however ME3Explorer 3.0 unpacked SFARs of official DLC are not properly unpacked and are the wrong size. |
| Mount.dlc | Used by the game to determine what load order for DLC, when to load the DLC, what messages to display for the DLC, and more. You can edit Mount.dlc files in Mount Editor in ME3Explorer - ME3Tweaks Fork's Mount Editor. |
| Default_[DLC Foldername].bin | Coalesced file for your mod. Even if there is nothing useful in it, this file must exist. Starter kit includes blank versions of every main config file so you don't need to manually add them. |
| [DLC Foldername]_[lang].tlk | Talk files for each language. Starter Kit will generate one for every language with the basic 5 required entries based on the information you input into the form. When you ship your mod, even if you don't translate it, you should copy over your language entries into the other files so other language users don't see string ID's like $1230003. Be sure to leave the original 5 lines at the bottom. |
Deploying your mod
Once you've wrapped up your development of your DLC mod, it's time to deploy it. Deploying your mod with Mod Manager will still allow manual installations (the only extra file is moddesc.ini), but installing with Mod Manager is easier, and provides a lot of sanity checks for developers and users.
Before you deploy
There are a few things I suggest doing before you actually deploy your mod to the file that you will upload to your host (which is typically NexusMods).
- Ensure you've set a version number in moddesc.ini. The descriptor name is modver and the value must be a semantic version number, so no letters or other non numeric items. Semantic versioning is done by each set of integers, so 1.02 is a higher version than 1.1. (since 02 is actually just 2).
- Make sure you do not have extra files in your DLC folder, like .bak or working copies. You should only ship what's necessary. I have seen many strange extra files in mods that I have inspected on NexusMods.
- Consider starting your NexusMods page. Obviously, since you don't have the file to upload yet, you can't publish it, but once you start creating a page you will have a mod id, which in turn means you will know the mod URL. Putting the URL to your mod in modsite in moddesc.ini (or edit it in the Moddesc Editor, which is available under Mod Utils) will give users a one click solution to finding your mod page for support with the mod or to give feedback. A proper NexusMods URL will also enable endorsements for your mod directly from within Mod Manager.
Deploying your mod to an archive file
Once you've done this, deployment is easy, just go to Mod Utils > Developer Options > Deploy mod.
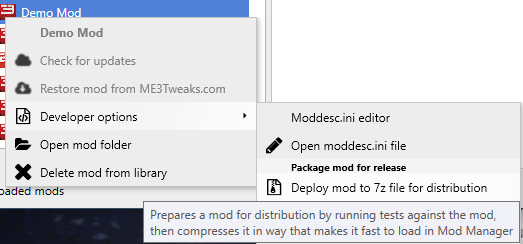
After some checks are performed on your mod to help weed out common issues, you will be able to deploy the mod. Mod Manager will package the mod up in a file archive that is quick to load, highly compressable, but without using tons of memory on client systems to decompress. All mods that are designed for use with Mod Manager should be deployed using it, as some features actually depend on the archive being setup a certain way, such as storing files that need quick access decompressed. If your mod is not deployed using Mod Manager, but has a moddesc.ini in it, users will be warned the mod is not properly deployed. Save everyone a headache and deploy your mod through Mod Manager - users can still manually install it, if they *really* want to for some reason.
If you're using the ME3Tweaks Mod Updater Service, you then upload the mod for the updater service as well. For support on how to do this, please come to the ME3Tweaks Modding Discord server.
How to tell users to install the mod
You can use the following line in your mod description on NexusMods for how to import into Mod Manager, or write your own.
To install this mod, import it into ME3Tweaks Mod Manager by dragging and dropping the archive onto the main window of Mod Manager. Import the mod, and then select the mod on the left, then press Apply Mod. To uninstall the mod, go to Manage Target and select [your dlc name here] and choose Disable or Delete. Note, Disable is not available for Mass Effect and Mass Effect 2, only 3.
The above is for basic DLC mods, you may need to include more information if your mod is more complex.
And there you have it. If you found starter kit or this guide useful and want to say thanks, just give credit to Mgamerz/ME3Tweaks Mod Manager on your mod page, I appreciate it. If you want your mod listed on the ME3Tweaks mods page and homepage, come to my discord and drop me a link.