Simple Modding Guide
Notice: ME3Tweaks does not condone cheating in online multiplayer. This guide is for informational and educational purposes only.
This guide serves as a basic entry point into modding Mass Effect 3 through the use of the Coalesced.bin file. You should be comfortable editing basic things in the game after reading this guide.
There are the tools you will need to follow this guide.
Table of Contents
- What is Coalesced?
- Extracting editable .xml files
- Editing the xml files
- Recompiling the .xml files into a Coalesced.bin
- Installing your mod
- Testing your mod
What is Coalesced?
Coalesced.bin is a file in Mass Effect 3 that contains a huge amount of variables that are used during gameplay. It is a compiled binary file and must be decompiled to a text file in order to be easily modified.
During the lifecycle of the game, BioWare made "balance changes" to the game every 1 - 2 weeks. These are coalesced updates that are downloaded to memory at the title screen and supercede any other values. For a long time, we could not override these, but with the Balance Changes Replacer ASI, we can now substitute our own balance changes file.
Application of Coalesced patches are as follows:
| Priority | Coalesced |
|---|---|
| 4 | Standard Coalesced.bin |
| 3 | DLC Coalesced (based on mount priority, which for official DLC is oldest to newest) |
| 2 | "Test Patch" DLC |
| 1 | Balance Changes (from BioWare or Balance Changes ASI) |
*Lower priorities supercede higher priorities
If you decide to edit other variables while following this guide, some will not take effect as they are superceded by DLC, patches, and balance changes.
Extracting editable .xml files
The first step to modding Mass Effect 3 Coalesced is to get a copy of an unmodified Coalesced.bin file, which can be found in the game installation directory under BIOGame/CookedPCConsole.

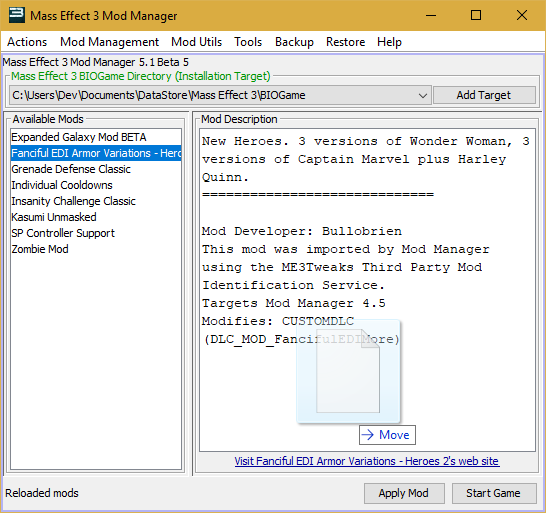
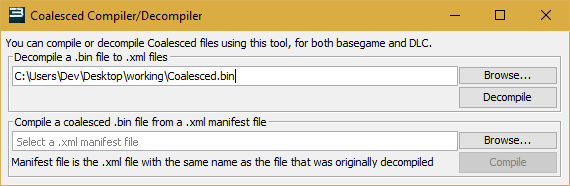
For this guide, copy this file out of the game directory into a folder, such as your desktop, or in a modding folder on your desktop. Make sure you keep a vanilla copy or you will have to repair your installation. Once you have a copy in a working directory, boot Mod Manager. Make sure the game target is set if it isn't already. You can decompile Coalesced files with Mod Manager by simply dragging and dropping the file onto Mod Manager's interface, and then selecting Decompile at the prompt.
In the same directory as where you dragged from, there should now be a folder with the same name as the file you just dropped, without the extension (Coalesced). Inside of this directory there should be several files. The table below shows what each file is for.
| Name | Description |
|---|---|
| bioai | Contains variables that the AI uses for weapons |
| biocompat | Compatibility variables - don't bother editing these |
| biocredits | Contains variables for the credits sequence |
| biodifficulty | Contains variables for enemies at different dififculty levels in both singleplayer and multiplayer |
| bioengine | Contains variables the engine uses to run the game |
| biogame | Contains the majority of game variables, including wavelists |
| bioinput | Contains the default keybindings for various game modes and keyboard locales |
| biolightmass | Light mass configuration that was used during compilation of Mass Effect 3 |
| biotest | Contains variables that were likely used while testing the game |
| bioweapon | Contains variables about weapons and their stats - mainly player values, but some values are inherited by ai in bioai |
| core | Default Unreal Engine configuration file |
| descriptions | Default Unreal Engine configuration file |
| editortips | Default Unreal Engine configuration file |
| engine | Default Unreal Engine configuration file |
| gfxui | Default Unreal Engine configuration file |
| ipdrv | Default Unreal Engine configuration file |
| launch | Default Unreal Engine configuration file |
| onlinesubsystemgamespy | Default Unreal Engine configuration file |
| startup | Default Unreal Engine configuration file |
| [coalesced filename].xml | Manifest file created by decompiler. Used to recompile, only modify if you know what you are doing. |
Editing the .xml files
For this guide we are going to modify the Geth Prime's rifle, the Ravager's cannon, adjust the number of enemies on the field at a time, and upgrade the shield recharge rate of engineers.
Explaining all the elements is not in the scope of this guide.
Editing the Geth Prime rifle
The Geth Prime rifle is a weapon object, and is used exclusively by the AI, and as such, can be found in bioai.xml. Once you open it and search for gethprimerifle, you should see the section shown below.
<Section name="sfxgamecontent.sfxweapon_ai_gethprimerifle">
  <Property name="ai_acccone_max" type="2">(X=0.0,Y=0.0)</Property>
  <Property name="ai_acccone_min" type="2">(X=0.0,Y=0.0)</Property>
  <Property name="ai_aimdelay" type="2">(X=0.0f,Y=0.0f)</Property>
  <Property name="ai_burstfirecount" type="2">(X=3,Y=3)</Property>
  <Property name="ai_burstfiredelay" type="2">(X=2.f,Y=3.25f)</Property>
  <Property name="ammopershot" type="2">0</Property>
  <Property name="damage" type="2">(X=230,Y=230)</Property>
  <Property name="idealmaxrange" type="2">4000.f</Property>
  <Property name="idealminrange" type="2">500.f</Property>
  <Property name="idealtargetdistance" type="2">3000.f</Property>
  <Property name="magsize" type="2">(X=10,Y=10)</Property>
  <Property name="rateoffire" type="2">(X=70,Y=70)</Property>
  <Property name="rateoffireai" type="2">1.0f</Property>
</Section>
This is how all of the xml files files are structured. If you want to learn more about XML, check out the Wikipedia article on it. As you can see, the variable names are fairly easy to understand their meaning. Remember, this applies only to the Geth Prime rifle.
For this tutorial, we will lower the damage of the Geth Prime rifle and make it fire faster as a wider arc, just like in my Insanity Challenge mod. Everyone seems to love that version of the Geth Prime.
Change the ai_burstfirecount X and Y values to 15 and 20, respectively. In many scenarios, the X is the minimum and Y is the maximum; thus, the Geth Prime will fire between 15 and 20 shots if it is not interupted. Ensure the ( and ) are not modified - this is a range struct and these must be retained.
That's all you have to do to make edits to Coalesced! Everything you will edit will be no more difficult than just changing some text. Some things like wave editing are more involved but there are no special skills required to mod the game in this way.
To make the Geth Prime fire faster you can change 1 of 2 things; The rateoffire attribute, or you can just change the rateoffireai multiplier. rateoffire is measured in frames (with 60 being 1 second). rateoffireai is a multiplier that is applied to rateoffire if the weapon is being used by an AI, which you can use to easily change the rate of fire. I typically use rateoffire over ai because it's easier to fine tune.
Editing some of these variables, such as ammopershot will not work because other variables that are inherited disabled this variable from being used. In the advanced guide, inheritance is explained.
The same procedure is done for the Ravager. If you search for ravager in the same file, you will find two results, sfxgamecontent.sfxai_ravager and sfxgamecontent.sfxweapon_ai_ravager. We will be editing sfxweapon_ai_ravager, as the other one does not have anything to do with its weapon. You can typically tell by what attributes are listed if it's not immediately obvious.
<Section name="sfxgamecontent.sfxweapon_ai_ravager">
  <Property name="ai_acccone_max" type="2">(X=2.05,Y=2.05)</Property>
  <Property name="ai_acccone_min" type="2">(X=1.05,Y=1.05)</Property>
  <Property name="ai_aimdelay" type="2">(X=0.0f,Y=0.0f)</Property>
  <Property name="ai_burstfirecount" type="2">(X=3,Y=3)</Property>
  <Property name="ai_burstfiredelay" type="2">(X=0.8f,Y=1.35f)</Property>
  <Property name="ammopershot" type="2">0</Property>
  <Property name="damage" type="2">(X=400,Y=400)</Property>
  <Property name="idealmaxrange" type="2">4000.f</Property>
  <Property name="idealminrange" type="2">600.f</Property>
  <Property name="idealtargetdistance" type="2">2500.f</Property>
  <Property name="magsize" type="2">(X=3,Y=3)</Property>
  <Property name="rateoffire" type="2">(X=75,Y=75)</Property>
  <Property name="rateoffireai" type="2">1.0f</Property>
</Section>
Up the rate of fire, decrease the damage, and increase both the ai_acccone_max and ai_acccone_min values to about 20 and 15, respectively. This the is the "cone" that the enemies use when aiming at you, and it is measured in degrees. At 90 degrees they will fire perpendicular to you.
Many enemy bullets can curve towards you to help compensate for "bullet lag".
Save and close the file.
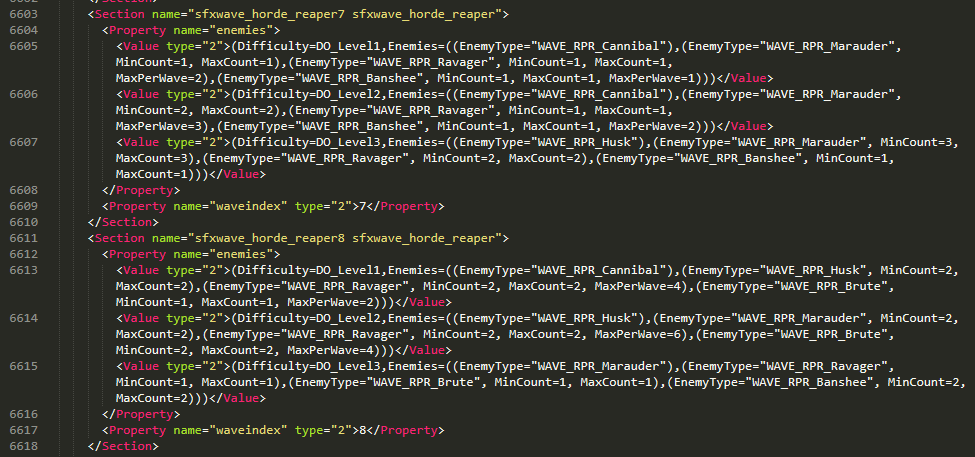
Adjusting the number of enemies on the field at a time
Mass Effect 3 limits the number of enemies allowed on the field at a time to 8, likely because consoles had limited processing power when computing AI pathfinding. PC doesn't have such a low limit, so let's add an enemy or two. This setting can be found in BioGame.xml.
Searching for the value maxenemies should yield 2 results, maxenemies and right beneath it maxenemiesperspawnpoint.
You should see the following.
<Property name="maxenemies" type="2">8</Property>
<Property name="maxenemiesperspawnpoint" type="2">5</Property>
These two values will change both how many enemies can spawn at a single point at a time (typically on wave load) and how many can run around on the field. More than 3 will make a very noticable impact, especially on objective waves. Set them to 12 and 6, respectively.
This will spawn more of the base enemy defined in a wavelist - all other enemies have a defined min and max value and won't be affected.
Save and close the file, as we are done with biogame.
Adjusting the Cerberus Engineer shield
The final part of the tutorial is perhaps one of the most interesting, where you can tweaks many enemy stats. Open BioDifficulty.xml.
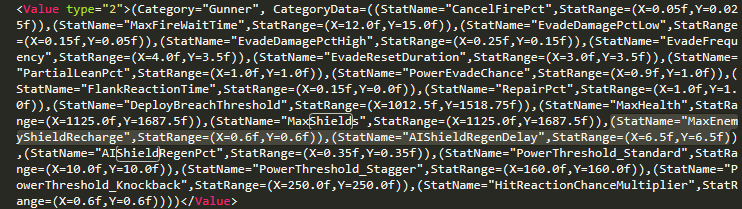
If you have word-wrap on in your text editor, you may see a huge jumbled blob that looks simliar to the following:
Do not worry. It is the same as what you have modified before, just a bit harder to read as these are structs. Turning off word-wrap might help, but it also makes it easier to get lost with the line you are editing. If you scroll up and down the file, you should see repeating patterns of categories, as well as headers such as level3difficultydata and such.
Note: The values listed in the wavelist are not final - they are superceded in higher priority files, but due to how replacements work, modifying anything will cause your edits to work and not the higher priority ones. This only works on certain types of values. In higher priority values there is sometimes additional values not listed here, such as the credits gained for extraction which was added in a later DLC.
These lines define stats for enemies across all difficulties in both Singleplayer and Multiplayer. You can modify tons of stats here from the rate of grenade throws to the sync-kill rate. We're going to be editing the gold multiplayer Cerberus Engineer, so find the sfxgamempcontent.sfxdifficultyhandlermp key, the level3difficultydata item underneath it, and finally find "(Category="Gunner" in that block.
Why gunner? It seems the engineer was going to be something else during development. Perhaps a pilot for the Atlas. Other enemies are sometimes named this way, such as the Dragoon being called Phoenix internally.
We will be changing the maximum recharge of the shield to 100%, lower the delay, and the speed at which it recharges. The first item we need to edit is MaxEnemyShieldRecharge, which you can find on the same line as the Gunner block. You may have to scroll a ways if you do not have word-wrap on. I know this block is hard to read - but bear with me for a bit longer. The relevant section you are looking for is this:
(StatName="MaxEnemyShieldRecharge",StatRange=(X=0.6f,Y=0.6f)),(StatName="AIShieldRegenDelay",StatRange=(X=6.5f,Y=6.5f)),(StatName="AIShieldRegenPct",StatRange=(X=0.35f,Y=0.35f))Here's a picture in this block:
We are going to edit these values.
MaxEnemyShieldRecharge
Change both values to 1.0f. This will allow the engineer to recharge his shields to 100%. The f stands for float, which essentially means it accepts decimal points instead of just integers. It's a data type used in programming. For these files it is not necessary but made it easier for the devs to distinguish what values could be input.
AIShieldRegenDelay
This value defines the delay before the shield begins to regen. This only takes effect if the engineer is not damaged, including damage-over-time. It is measured in seconds. We will lower this to 3.0f. Making this value low makes the engineer very difficult to kill on higher difficulties as he will constantly shield gate your attacks.
AIShieldRegenPct
The regen percent value is how fast the shield regenerates over a second. It currently can regenerate up to 25% a second, which is pretty quick, given the original shield only could go up to 30 after being depleted that far. If you change this to something like .1f for both values, it will take 10 seconds to fully regenerate the shield, something you could expect an engineer to be able to do. Changing this to a high value will make the engineer very difficult if not impossible to kill via damage-based death (out of bounds will still kill him).
That's all you have to do to mod the files of the original Coalesced.
Recompiling the .xml files into a Coalesced.bin
Now that you have your files modified, it's time to put them all back together into a modded Coalesced file. Make sure all your files are saved - it is very easy to forget to do this, and waste time trying to figure out why something is not working. Additionally make sure all parenthesis are correctly matched, commas are in place, and you did not enter linebreaks for large blocks of text (ini files must have unique entries all on the same line)
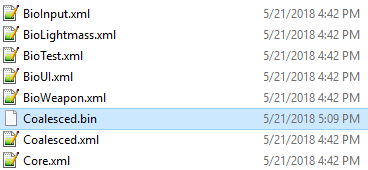
There is a manifest file in the folder with your other .xml file that has the same name as the original file you decompiled (Coalesced.xml) - this is the manifest file that tells the coalesced compiler what files to merge into a new binary one. Drag and drop this file onto Mod Manager to compile Coalesced.
Choose the Compile as coalesced manifest option.
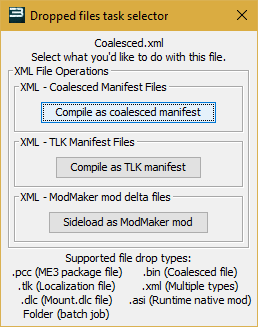
Assuming you do not have any syntax errors in your XML files, a new Coalesced.bin file will appear next to the manifest file.
If this happens to you, I would suggest using Free Formatter, an online XML validator. Copy and paste the entire contents of the files you edited into the field and click Format XML. Do note that it may take some time to validate and format your XML.
Installing your mod
There are two ways to install your mod. You can do it manually, which is easier in this scenario, or you can build a mod package for Mod Manager which makes it only a click or two to install and revert your mod. Personally I always prefer Mod Manager, but I'll cover both.
Manually installing your mod
Manually installing your mod is fairly simple for mods that do not edit DLC. All you need to do is make a backup of your Coalesced.bin file in your Mass Effect 3 directory, and copy your new one into it's place with the name Coalesced.bin. Then, using Mod Manager, go to Tools > Run AutoTOC on game. This will ensure the game allocates enough memory for your modified file.
Install using Mod Manager
Installing mods using Mod Manager will save you a ton of time if you choose to play around with Mods. Directions on how to do this are located in the Mod Manager FAQ. You can use other mod templates to get started.
Testing your mod
Your mod is now installed. The best part comes next. If your game was running during the tutorial, you'll need to restart it so it can pick up the new Coalesced.bin values. Your game should now be a little different, with it being a bit harder, but a bit faster too!
Ready for more? Read the other modding guides guide and tweak to your heart's content! Or was this too much work? Well, that's cool too, because I made ME3Tweaks ModMaker, a web application that does all of this for you and makes it super easy to do everything I just described with pictures, validation, and lots of other awesome goodies. Check it out!