PCC Editing Guide
ME3Tweaks does not condone cheating in online multiplayer. This guide is for informational and educational purposes only.
This guide will show you how to make Atlas2 drivable in multiplayer, as a reference on the process of pcc editing.
There are the tools you will need to follow this guide.
- TankMaster's Coalesce tool
- ME3Explorer - Requires .NET 4.5
- A DLC Authorizer
- Notepad++ or other text editor
Table of Contents
- What are pcc files?
- Loading Atlas2 into PCCEditor2
- Initialization scripts
- SetInitalState script
- Updating GlassCockpitHealth
- Testing your changes
- Final Product
PCC editing is very complex. As such, this guide will likely have errors in terminology and such. Additionally you'll want to know some basic programming concepts as this directly deals with game code.
What are pcc files?
PCC files are "cooked" Mass Effect packages, generated by Unreal Engine. These pcc files contain game assets such as textures, 3d models, and nearly everything else the game requires to run (besides the engine itself, which is the exe). Through reverse engineering the file format, the ME3Explorer team has made it possible to edit them.
There as some caveats however, and the process is typically pretty time consuming. With that out of the way, lets get started. We're going to be script editing. I'm going to be using ME3Explorer 109K, but the screenshots of a personal build, so they might be slightly different than the version you use.
Loading Atlas2 into PCCEditor2
You might have asked up above, "Atlas2"? Bioware added a DoT rocket to the Atlas in Retaliation, which made them replace the original Atlas with Atlas2. It is named SFXPawn_Atlas2, where the original was just SFXPawn_Atlas. So we need to load Atlas2 from MP4, so we open ME3Explorer and choose PCCEditor2.

PCCEditor2 will load, and then you will have a blank screen (or the contents of the last PCC you had open). In the menu, select File > Load from DLC.

From here we must navigate to the Default.sfar for MP4. It is in your Origin Games folder, under Mass Effect 3\BIOGame\DLC\DLC_CON_MP4\CookedPCConsole. Open the Default.sfar file. Once you do this, a new window will popup. You might need to expand it so you can read all the entries. Scroll down a ways and find SFXPawn_Atlas2.pcc. The list is alphabetical. Do not choose the LOC ones.
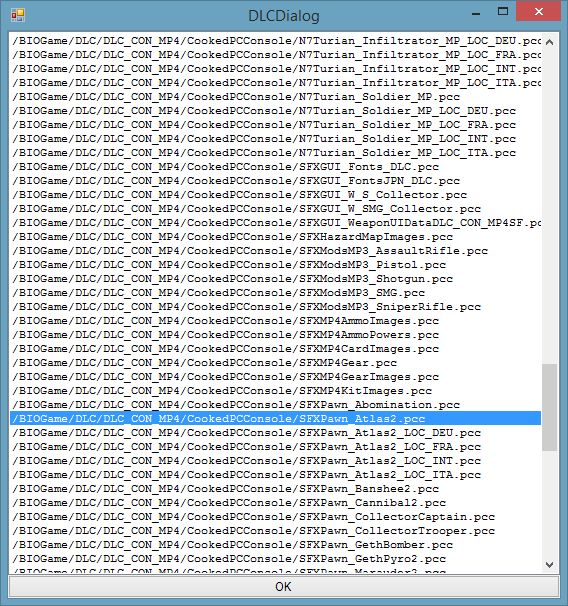
Select OK. It may take some time to load the PCC file and extract it, and it may appear that ME3Explorer has stalled. Just wait until everything appears. You will be presented with this screen when it loads.
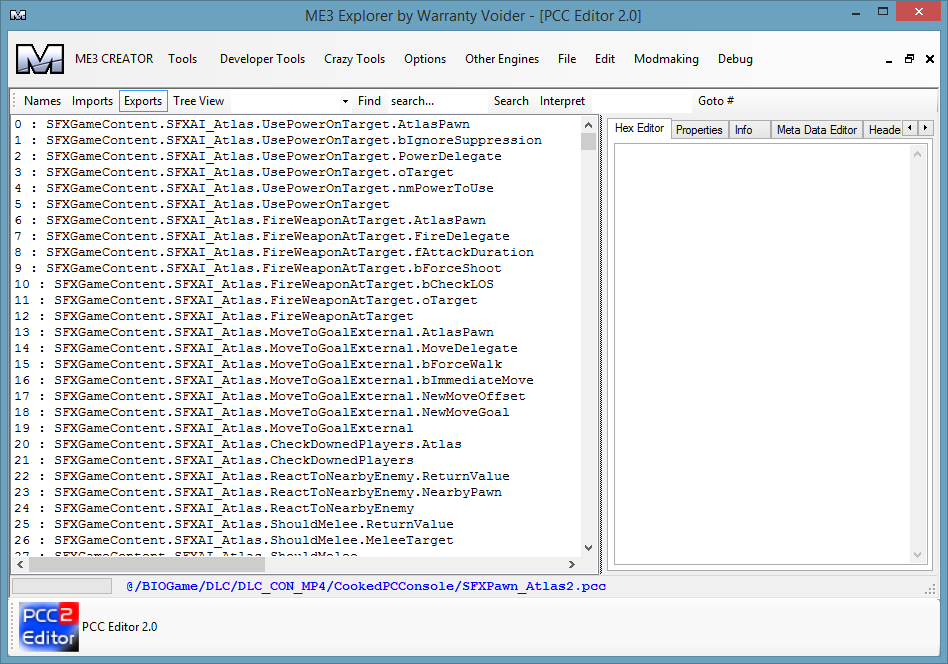
Initialization scripts
If you have read the console commands guide, some of these will look familiar. UsePowerOnTarget? That sounds like a function, and it is. We're going to be editing one of them, but it's going to be very simple edits since we don't have a bytecode compiler. Before we make the Atlas drivable, lets go to the "Find" bar, type in initialize and then choose Search.
It may take some time for it to search depending on the speed of your computer, PCCEditor2 is very CPU intensive. It should take you to the following line. Select the Script tab on the top right.
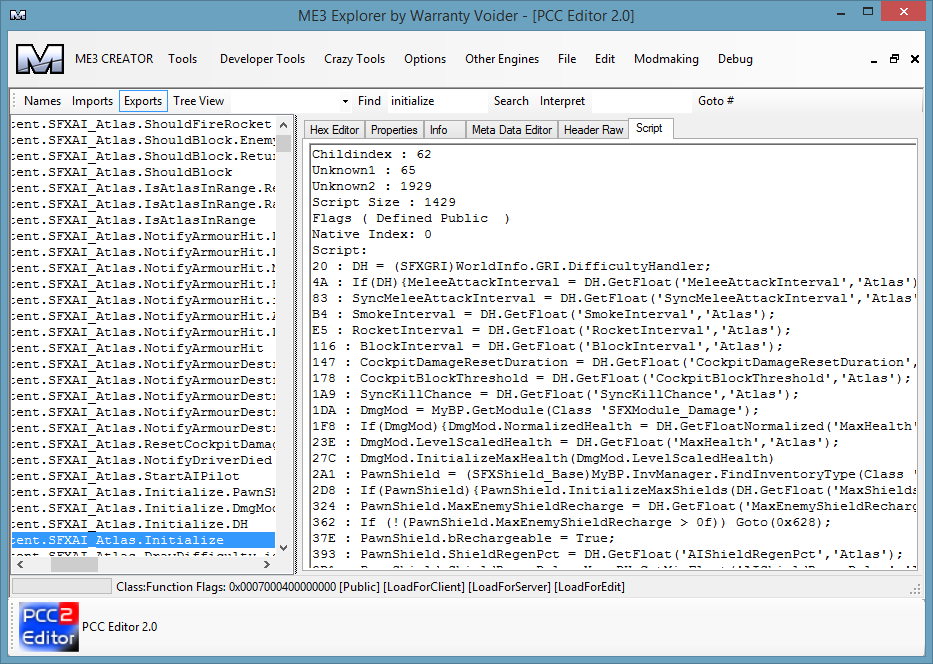
The code on the right is reverse engineered Unreal Engine 3 bytecode in human readable format. In version 109K it did not have a scrollbar, so use your scroll wheel to go up and down the list. This script looks long and the bottom looks really scary, but we'll go through it. But do you notice something?
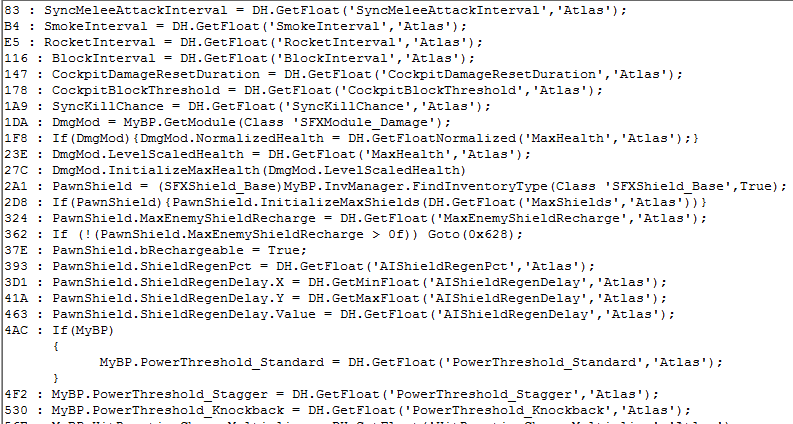
This shows it reading information from the Biodifficulty.ini file. For example, on the 1F8 line, it is getting the floating point number from "MaxHealth" under the heading "Atlas". This also shows how shields are added to an enemy - I've had requests to add shields to husks and such. Adding them to biodifficulty does nothing because the script doesn't bother to load it. Since we don't have a compiler for pcc files, we likely never will be able to add them (perhaps if you redirected this function to your own it would work, but that's far beyond my knowledge).
SetInitialState script
Our target lies in another script however, named SetInitialState. Search for that and you should be at 988, SFXGameContent.SFXPawn_Atlas.SetInitialState. In the script tab you should see a fairly long script, but it contains a key piece of code in it that makes the Atlas different in MP than it is in SP.

This is an if statement where the Global Replication Info (GRI) is checked to see if it is multiplayer, which it is. The ! at the start is a not, so if it is not multiplayer, jump to 0xFD, which is a hex address offset, which goes past a few lines of code. So essentially, if it is singleplayer, skip the next two or three lines. Additionally at CE we have another Goto/Jump statement, down to 0x2EB. This is beyond all of the driver initialization part where an assault trooper is loaded and assigned health and such.
I'm not sure if it is a relative jump or an exact jump. The lines on the left are the hex address of where that line of code starts, so 0xFD is somewhere after 0xD1 but before 0x10F. I'm not too sure what that means, but it isn't too important at this point for the scope of this guide.. As you can see though, if it is multiplayer, ClaimingPawn = this. That has important implications, as this is a keyword in many programming languages that refers to "itself" in terms of object oriented programming. While the atlas might be a single "class" of object, you have can multiple Atlases spawned at once, so each one is an instance, and to refer to your own instance, it uses the word this. In this context, it means the Atlas claims itself.
What does that mean? Well, if an atlas is claimed, it cannot be driven (by players). Additionally nothing can get into it unless something gets out, but this code skips adding the new driver, so the Atlas is technically it's own driver, rather than the Assault Trooper. Technically the Atlas drives itself and only does so when the assault trooper is in it, but that's irrelevant. Additionally the glass health is 100000 in multiplayer, which is why it never appears to break anyways. Even if you do break it, the atlas is driving itself, and there is no driver, and you can't shoot and kill the Atlas driver, since it would kill the Atlas itself (since it is its own claimingpawn). Got all that?
What we are going to do is reverse this if statement to if it is not singleplayer. That means we are going to change that True to False. To do that we need to know where True is defined in the script hex code, so scroll down to the debug code at the bottom. Scroll through it until you find where it is reading the token bIsMultiplayer (not the large if statements that appear on line 25, but on 40).
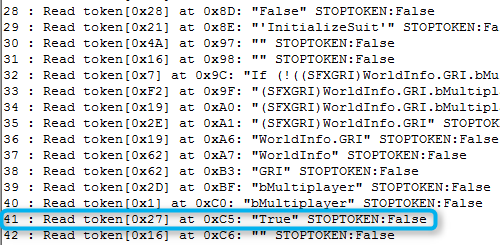
As you can see by this debug print, it has read in order the names of variables and values from the bytecode. You can find where something is by matching the variables near something in the decompiled script (top part) to the debug output of the lexer (bottom part). Bytecode is composed of tokens, which are like "symbols". They tell you what exactly to do. It is a "middle" state between native code (machine instructions) and source code (e.g. Atlas.turnLeft(50)), which has to be fully read and then parsed. This is how Unreal Engine makes games work on consoles, it compiles to bytecode, and then each platform (PC, PS3, etc) has its own native bytecode reader that makes it run on that platform.
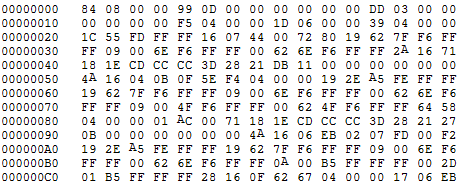
These tokens are defined as bytes. On line 41 you can see token 0x27 was read, which stands for "True". If you look up at line 28 you can see 0x28 is "False", so we are going to change a 0x27 to a 0x28. Where? At 0xC5 of course, as it says on line 41. Change to the hex editor tab.
Look at the C0 line, which means that the first item on this line is 0xC0 (address). We are looking for 0xC5, so we go 5 bytes to the right. A hex couple is a byte (two 4-bit numbers), so its just 5 couples to the right.
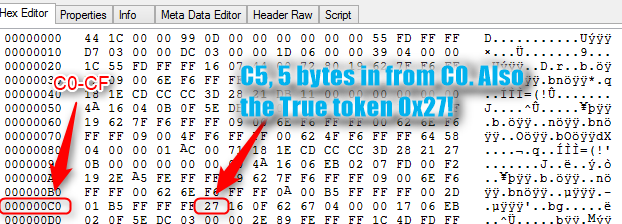
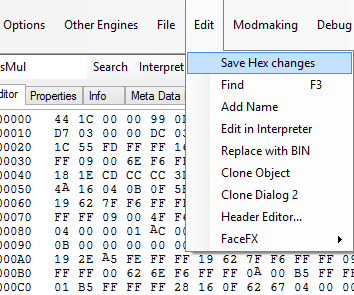
Huzzah! It's token 0x27, True, right where it said it would be. Place your cursor on the 7 and change it to 8 so it now reads 28. Now go to Edit->Save Hex Changes. You won't see anything happen, but we now need to verify that the change took effect. Click on any other entry in this pcc (such as the Initialize script again), and then back to SetInitialState.
Return to the script tab. Now check the !...bIsMultiplayer == part. It now reads !bIsMultiplayer == True, which means if it is not multiplayer - exactly what we want. The game will now create an enemy - or will it?
This SetInitialState script is defined in SFXPawn_Atlas - not SFXPawn_Atlas2 like I stated before. While you would think this works, Atlas2 is what is initialized, not Atlas. Atlas2 shares most of its code with Atlas1 which is why this exists. But now you know what to do. Search for SetInitialState again - you will get a match on SFXGameContentDLC_CON_MP4.SFXPawn_Atlas2.SetInitialState. This is the one that is called when the pawn spawns. Nothing has changed here including the addresses, so change 0xC5 from 0x27 to 0x28. Save your hex changes and verify it is correct as we did above.
Your final code for this script should look like the following photo, with only that single byte change.
Save your PCC file. You can either save into the DLC directly and overwrite it, or you save externally to a file. I would suggest creating a Mod Manager package for it and saving it externally as if you make mistakes it's easier to correct. For this tutorial, save externally using plain Save from the file menu. Save it somewhere, and make sure it is named SFXPawn_Atlas2.pcc.
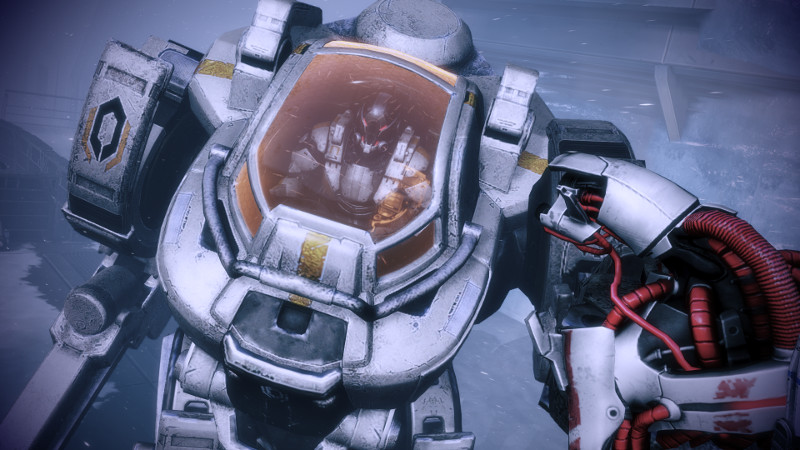
This will make the driver appear. That doesn't really mean a lot though, because the Atlas glass still doesn't break. So we have to go into Coalesced and modify GlassCockpitHealth to be somewhere around 1000 or lower.
Continue reading this guide rather than trying to test your changes - if you save into the DLC and try to play, the game will freeze when loading the Atlas2.
PCCEditor saving does not keep the same filesize as the original - so you must redo the PCConsoleTOC.bin for the DLC. You will need to update the SFXPawn_Atlas2.pcc file. See the DLC Editing Guide if you don't know how to do this. Once you update your TOC for SFXPawn_Atlas2.pcc and inject it (through Mod Manager of course, or ME3Explorer DLCEditor2 if you so choose), you'll get the following.
Updating GlassCockpitHealth
So the driver appears now, great. That doesn't mean a lot since you can't kill him and get in, so we dive into Coalesced's Biodifficulty to modify it. The Atlas2 was never updated through a patch in terms of Biodifficulty, so download the MP4 coalesced file and unpack it using either Gibbed DLC or Tankmaster's Coalesce tool. For this tutorial I would suggest using TankMaster's - they both have bugs, but the ones in Gibbed's are far more visible than TankMasters. Once it is extracted, open the folder and open Biodifficulty.xml
Search for handlermp, as it seems the MP enemies also have definitions for SP. Could be Bioware's biodifficulty file was built by code, or maybe they planned on adding them to SP. Anyways, look for Atlas2 (the only replaced enemy with a fully defined new biodifficulty entry), and then find GlassCockpitHealth in that. It will be 100000.0, so change it to something like 1000, or 1. If you make it too high its really hard to kill and get in.
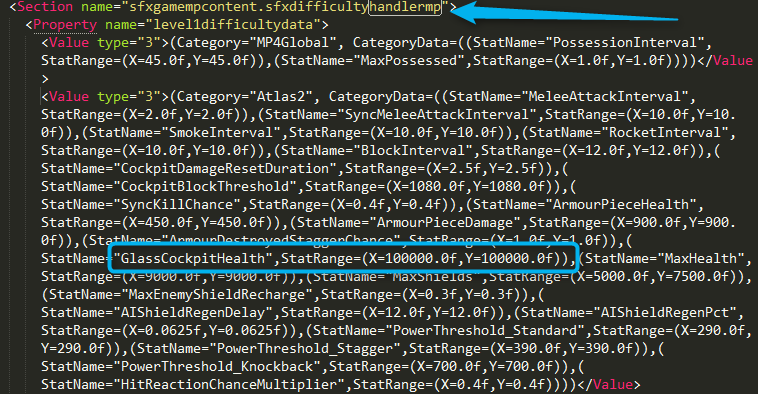
Edit them all for level1difficultydata,level2difficultydata,level3difficultydata and level4difficultydata. Save your changes and close the file. You now need to find Default_DLC_CON_MP4.xml file (it's in the same folder as Default_DLC_CON_MP4 that Tankmaster's tool made - above Biodifficulty.xml). Drag and drop this file back onto Tankmaster's Coalesce tool and it will recompile the Default_DLC_CON_MP4.bin file for you.
Due to bugs in TankMaster's tool you will need to recompile the original Coalesced as well, Coalesced.bin. I've tried to contact him because I know what the issue is, but he hasn't responded in weeks. There's no source code either, so we don't have any fixes. If you don't recompile the original Coalesced.bin, it will load SFXPawn_Atlas.pcc, not SFXPawn_Atlas2.pcc (we edited SFXPawn_Atlas2.pcc). You don't need to make any changes, just decompile it and then recompile it.
Great. Now you have the glass breakable and the pilot loading. All that's left to do is to update your PCConsoleTOC.bin again for the new Default_DLC_CON_MP4.bin file and it's ready to go.
You can use the AutoTOC feature of Mod Manager to skip updating TOCs for your mods - it'll save you a ton of time.
You can also use the DLC TOC Updater of ME3Explorer to automate TOC updating once you've injected the 2 updated files into MP4.
Testing your changes
The final step is to test. I find that it's easiest to kill the pilot and break that glass with the Javelin (to kill the pilot) and the Arc Pistol to break the glass once the shields are down. You cannot damage the pilot or the glass if the shields are up. You can use the javelin to kill the pilot, but its easy to miss and you take a lot of health out of the Atlas when you do so.
Final Product
By following this guide you should have produced the source files located in the Drivable Atlas mod, which you can download for comparison (The Drivable Atlas mod sets ClaimingPawn = None, but it has no effect).