DLC Editing Guide
ME3Tweaks does not condone cheating in online multiplayer. This guide is for informational and educational purposes only.
This guide is outdated and will be rewritten soon. A good chunk of the content listed is no longer how to properly do it.
This guide will show you have to modify DLC and repack it with ME3Explorer. It will also cover some DLC specific Coalesced changes.
Here are the tools you will need to follow this guide.
- Gibbed's Coalesced.bin Tool for DLC Coalesced
- ME3Explorer - Requires .NET 4.5
- A DLC Authorizor
- Notepad++
You should understand the concepts in the Simple Modding Guide fairly well before attempting this guide.
Table of Contents
- DLC in Mass Effect 3
- Extracting DLC files with ME3Explorer
- Decompiling DLC Coalesced
- DLC Coalesced Format
- Updating PCConsoleTOC.bin
- Repacking DLC files with ME3Explorer
DLC in Mass Effect 3
DLC for Mass Effect is stored in .sfar files. They are essentially proprietary zip files that typically use LZMA compression on them and can be found under /BIOGame/DLC/<DLC>/CookedPCConsole/Default.sfar directories from your install directory.
Before we begin this guide you should make sure you have a backup copy of whatever DLC you choose to edit. If you have Mod Manager you can use the backup feature to create a .bak file for your DLC, otherwise you will have to fix it through Origin.
Extracting DLC files with ME3Explorer
To extract files from .sfar file we will be using the DLCEditor tool from ME3Explorer. In recent versions there is a DLCEditor2 tool which seems to have less bugs at the cost of less UI. In this tutorial we will be modifying MP4, Retaliation. Retaliation added a lot of new items and overwrote many old ones so it is one of the most modified DLC in all of my DLC mods.
Depending on the version you have you might have a slightly different interface. This tutorial will use DLCEditor2, but you can use DLCEditor if you want a more polished look. Both are functionally the same when extracting files. Select DLCEditor2 from the Tools menu.

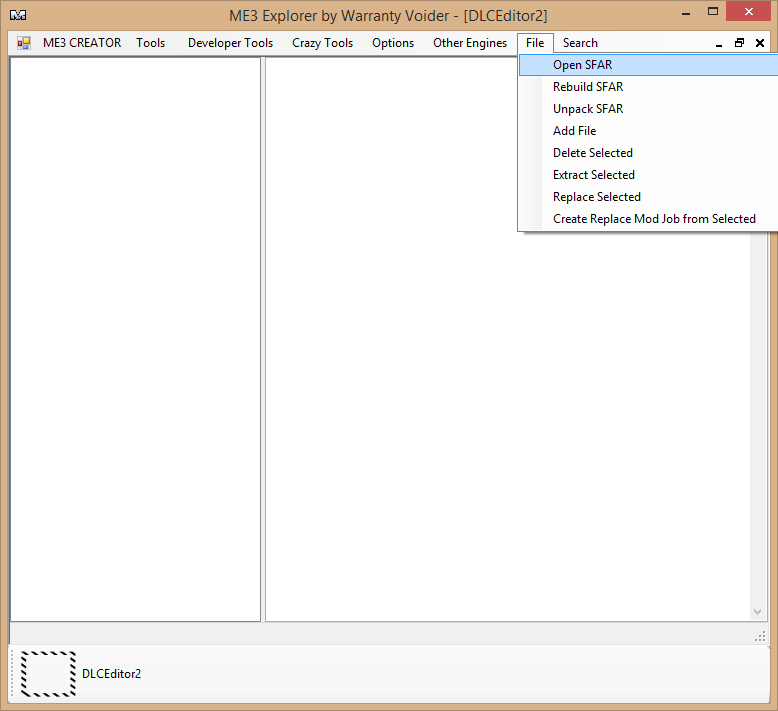
Once the tool is open, select File, then Open SFAR. Navigate to /BIOGame/DLC/DLC_CON_MP4/CookedPCConsole and select the Default.sfar file.

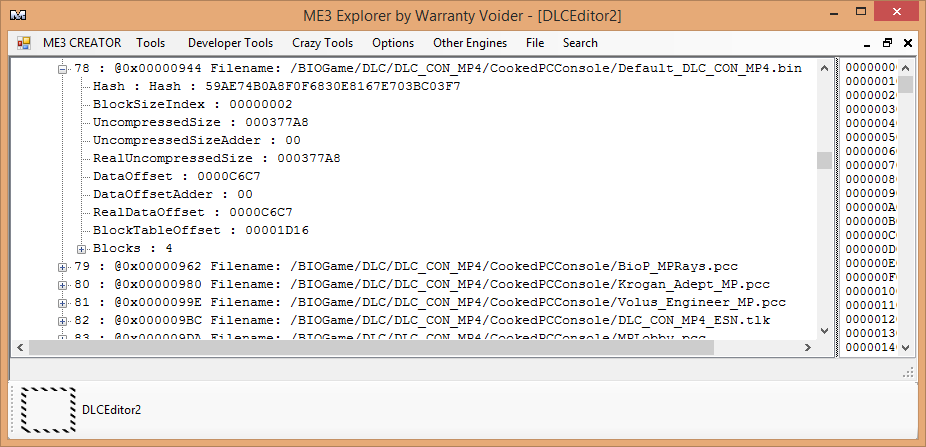
In the left panel you will see a tree, expand it and open File Entries. This shows a lot of technical data about the sfar file, but you will see a list files. The easiest way to navigate this is to search, so search for .bin It will find Default_DLC_CON_MP4.bin, which is the DLC Coalesced file.

To extract this file, select it so it turns blue, then goto File > Extract Selected. You additionally need to extract PCConsoleTOC.bin for this guide, or it won't load the DLC. Alternatively if you want to just dump everything you can unpack the SFAR with the Unpack SFAR option. You can use this method to extract any file out of any DLC you want.
Decompiling DLC Coalesced
To decompile the Coalcesed you just extracted, you cannot use the original decompiler from Gibbed. It won't work with DLC Coalesced. You must use the patched one at the top of this page instead; it acts exactly the same as the original. You must use this one to compile a DLC Coalesced file as well.
DLC Coalesced Format
If you've already tried to edit the DLC you might have noticed a new format for the data. In the DLC, decompiled Coalesced files look like this:
    "engine.gameinfo": {
      "defaultmapprefixes": [
        {
          "Type": 2,
          "Value": "(Prefix=\"MPLobby\",bIsMultiplayer=TRUE,bUsesCommonPackage=TRUE,GameType=\"SFXGameMPContent.SFXGameInfoMP_Lobby\",OverrideCommonPackage=\"BIOP_MP_COMMON\",ForcedObjects=(\"BioGlobalResources.BioGlobalResources\"))"
        },
        {
          "Type": 2,
          "Value": "(Prefix=\"MPLobby\",bIsMultiplayer=TRUE,bUsesCommonPackage=TRUE,GameType=\"SFXGameMPContentDLC_Shared_MP.SFXGameInfoMP_Lobby_DLC\",OverrideCommonPackage=\"BIOP_MP_COMMON\",ForcedObjects=(\"BioGlobalResources.BioGlobalResources\"))"
        }
      ]
    },
Compare this to the basegame version:
{
  "name": "..\\..\\biogame\\config\\bioengine.ini",
  "sections": {
    "animationcompression": {
      "alternativecompressionthreshold": [
        "1.f"
      ],
      "bonlycheckformissingskeletalmeshes": [
        "False"
      ],
      "deadbones": [
        "LeftShoulder-Swivel",
        "RightShoulder-Swivel",
        "LeftHip_Swivel",
        "RightHip-Swivel"
      ],
Every item in DLC Coalesced now has a "Type" and "Value". Nearly all entries are Type 2, though I have seen a couple of Type 1. Type 2 seems to be override then append (if the value doesn't exist), and Type 1 seems to be override only. Needs verification The value is the "value" of the name of the object, like what it is in the original Coalesced.
For this guide we are going to make all Collectors on all waves have the ability to become possessed. This is located in the decompiled 3_biogame.json file. Inside of this file, you can search for possessedwaves to find the different enemies, difficulties, and their respective waves they can become possesed on.
    "sfxgamecontentdlc_con_mp4.sfxpawn_abomination": {
      "damagescorebudget": [
        {
          "Type": 2,
          "Value": "200"
        }
      ],
      "killbonusscore": [
        {
          "Type": 2,
          "Value": "20"
        }
      ],
      "possessedwaves": [
        {
          "Type": 2,
          "Value": "(Difficulty=DO_Level1,Waves=(false,false,false,false,false,true,false,false,false,true,false))"
        },
        {
          "Type": 2,
          "Value": "(Difficulty=DO_Level2,Waves=(false,true,false,true,false,false,false,true,false,false,true))"
        },
        {
          "Type": 2,
          "Value": "(Difficulty=DO_Level3,Waves=(false,true,true,false,false,false,true,false,false,true,true))"
        },
        {
          "Type": 2,
          "Value": "(Difficulty=DO_Level4,Waves=(true,false,true,true,true,true,true,true,true,true,true))"
        }
      ],
If you want to have more enemies possessed at a time you can find that in the MP4 Biodifficulty file, in the global sections of each difficulty. This is how Zombie mod was done.
Change all of them to true (or all to false) and save the file. Make sure you look through all the possessedwave entries as there are several Collector enemies.
Some possessions won't take effect as they are overwritten by UPD_Patch01 and UPD_Patch02 - but they're also DLC, so you can modify them too!
At this point of the guide, you should recompile your Default_DLC_CON_MP4.bin file using the DLC compiler you used to decompile it earlier, in the same fashion as in the Simple Modding Guide.
Update PCConsoleTOC.bin
Every DLC has a PCConsoleTOC.bin file which must be modified if you modify game files and they become larger than the original. The basegame has a PCConsoleTOC.bin but it appears to be ignored. This file contains the sizes of all files that need to be loaded so that the engine knows how much memory to allocate. If the value is not large enough, the game will crash when it tries to load data into space it has not allocated. Since Gibbed's Coalesced compilers do not compress as efficiently as BioWare's, even no changes to the vanilla file will result in a larger one than the original. We use a tool called TOCEditor to fix this.

The values in these screenshots may be different than yours.
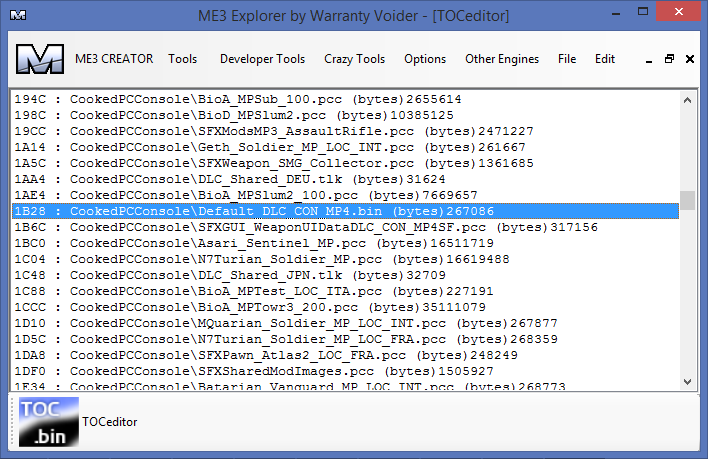
Once the tool is open, select File > Open, and open the correspending PCConsoleTOC.bin file for this DLC that you extracted earlier. A list of files will be displayed. To quickly find the files you have edited, you can use the search feature, at Edit > Find String and search for file. For this guide, search for .bin and press F3 (Find Next) until it finds Default_DLC_CON_MP4.bin.

Select Edit, and then choose Edit Filesize. Now you will need to know the exact filesize (or at least, larger, but I prefer exact) in bytes of your modified files (excluding PCConsoleTOC.bin). To find this, navigate to your modified file using Windows Explorer (the file browser) and right click on your modified file (in this case, Default_DLC_CON_MP4.bin) and select Properties. The value you need to use is Size (not size on disk). Use this value in the ME3Explorer dialog box that asks for the size.

Finally, when you have updated all your modified file entries, select File > Save. Your PCConsoleTOC.bin is now updated and you're ready to repack the DLC.
Repacking DLC files with ME3Explorer
Once you have modified the files you wish to modify it is fairly trivial to repack them. Using the same process you used to extract a file, select File > Replace instead. Be sure to replace your modified files as well as PCConsoleTOC.bin or nothing will work.
Alternatively you can build a mod package for Mod Manager to avoid the repacking stage in the future. The mods included with Mod Manager should be a fairly easy template to get yourself started.
Testing your changes
Once you have completed all the above steps, it's time to play the game. You will need to use either Launcher WV or Binkw32 bypass or you will get something similar to the following screen.

If you do not get the following screen you are good to go!