GUI Editing Guide Part II
This guide is not yet complete! There is still quite a bit of work to do. Example 3 is complete, the first two are not.
This guide will show you how to modify SWF scripts as well as other small changes in SWF files in Mass Effect 3. Extraction and repacking of GUIs is specific to ME3, but the actual use of JPEXs to modify the interface applies to all SWF files, and other games using scaleform. In this guide I will be referring to PCC files - Mass Effect's variant of the UPK file format. Other Unreal Engine 3 games may have a different main file type, just substitute it with your game's.
This is the second part of this guide that contains technical assembly programming of SWF scripts. If you haven't read the first part of this guide, do so now as I won't be covering those concepts here.
There are the tools you will need to follow this guide.
- Mass Effect 3 Mod Manager Command Line Tools
- ME3Explorer - This guide uses version 2.0.6, but newer versions are better.
- A DLC Authorizer
- JPEXs
- HxD Hex Editor
- SWF File Format Documentation (Flash 9, still mostly applicable still). You will use this documentation extensively.
Table of Contents
GUI editing is very complex. You will need to understand the idea of program disassembly to effectively follow this guide.
This guide was made using JPEX 9.0.0, while the part I of this guide was done with a previous version. They should both still be compatible with no issues, but you should typically always use the latest version.
Seriously though, open the flash file format documentation. It is an invaluable resource when trying to figure out things in this guide and will be the only way to find assembly instructions. DO IT!
Example 1: Changing Screen Scaling
Stock PC HUD SWF for following along (save as)
This example is not done. A bit more works needs to be done at the end.
In all 3 of my controller interface mods, screen scaling has been one of the features. SP Controller Support has both Xbox and scaled UI, and the MP Controller Support (Scaled) has the same features as well. Interface Scaling Mod also scales up the UI. All of these mods make use of Flash Player's convenient stage scaling features.
Lets pop open the standard ME2_HUD GUI, which contains the main HUD such as weapons, health, and enemy target health.
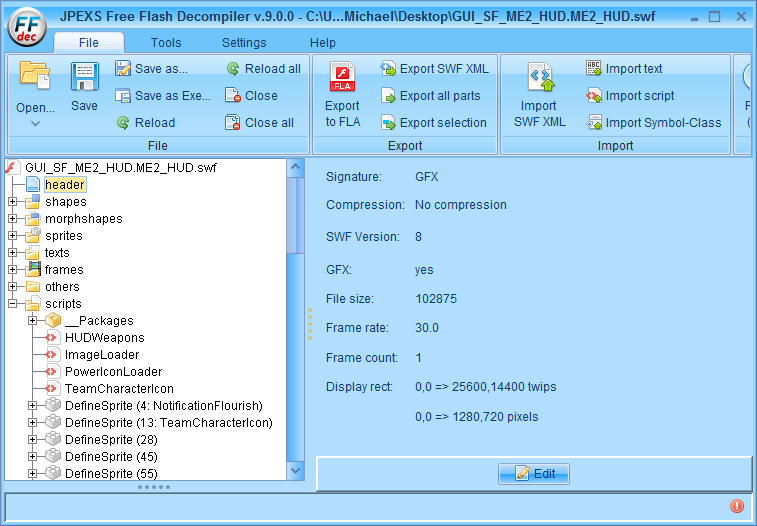
Since we are going to be scaling this HUD, we first should find out what size it is on the actual screen. Go to the header category to get this information. As we can see, this is 25600x14400 twips. Dividing those by 20 nets us 1280x720, the classic console resolution.
You may ask yourself how a 1280x720 HUD fits on your display, which most times on PC isn't 720p. As stated earlier, flash does a pretty good job of handling scaling - but this isn't actually scaled. You can tell by looking at the decompiled code and looking for stage.scaleMode=. It will be noBorder (scaling) or noScale (no scaling at all). In this file, the hud elements are positioned at runtime using some helper methods BioWare put into its GUI files. Let's take a look at how this HUD does item placement by going to scripts/frame1/DoAction.
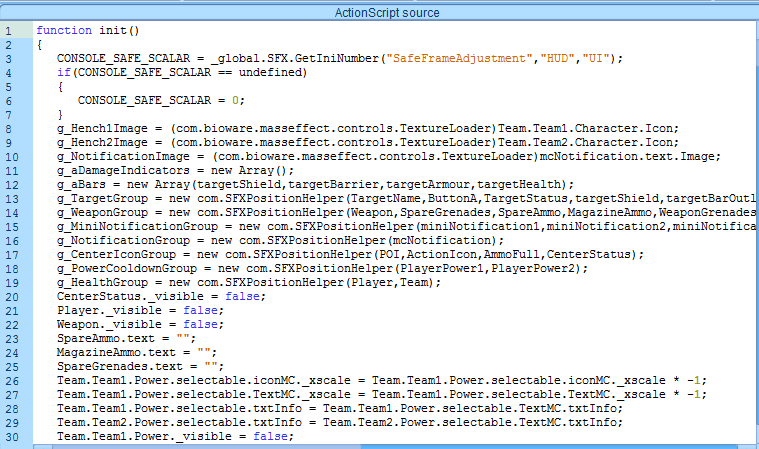
On the left, in the actionscript source, we can see the reverse engineered code. You will almost never edit this unless you are trying to get an idea of how to write your P-Code, which appears on the right side. The decompiler/compiler is not 1:1 so you will have errors introduced into your code if you try to use this method of editing.
At the top here, we can see the function init(), which means this code has to be called. Items outside of a function will be called as soon as this frame is loaded, which for frame1 is when SWF begins to be played. Immediate code is located at the bottom of the file, so lets scroll there.
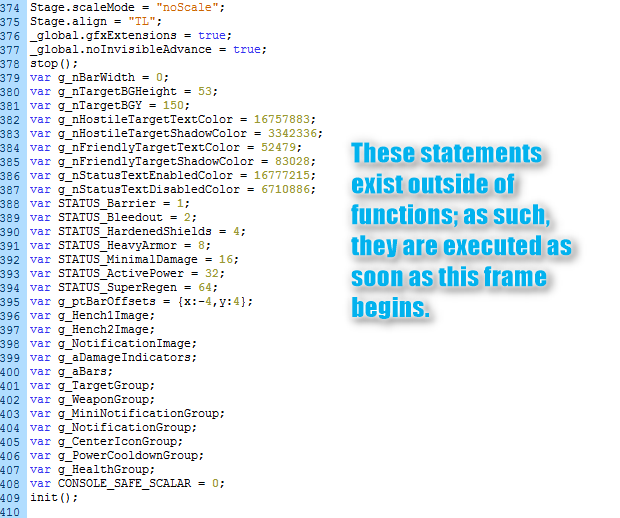
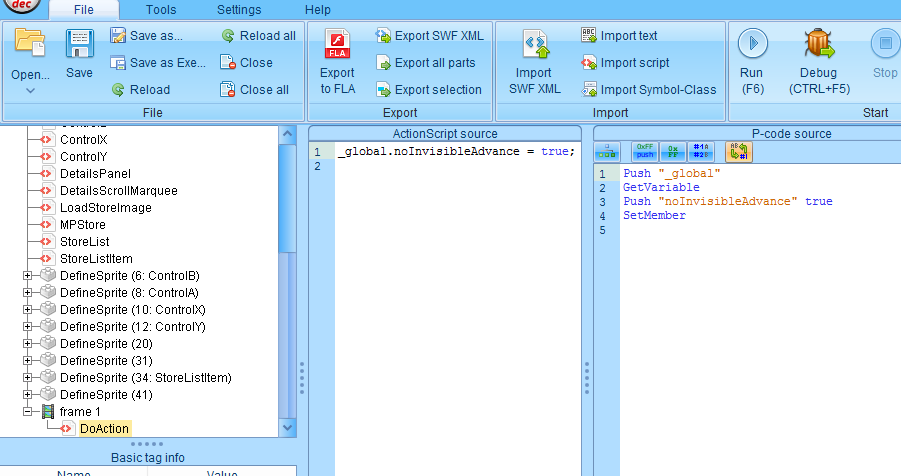
At the bottom here, we can see the statements that will execute once this frame is loaded. Many of them are variable declarations that are global (technically, instances of this GUI), so they can be shared by all functions in this SWF. At the top we can see the scaling mode is set to noScale, which means there is no scaling done on the stage. We have the stage alignment, which means the child components will default to the top left of the stage.
We also have Scalform extensions on, and scaleform's noInvisible advance. I'm unsure what these last two really do, but don't change them.
At the bottom, we can see init(), which indicates that the init method at the top of the script is called, as we saw earlier.
Going over this briefly, this sets up the default HUD values, such as making damage indicators off and creating GUI groups (such as the weapon and health groups). We can see on lines 12 - 19 the creation of groups using the SFXPositionHelper class, which is a class located in the scripts/__Packages/com folder. You will rarely ever edit these files, however they contain methods and groups you may find very useful as they are located in nearly all files. Some have a few additional classes which you will need to check for.
The SFXPositionHelper class takes a group of elements (notably sprites) and can snap them to different sides of the screens, at different offsets. Lets look at targetgroup, which is defined on Line 13. We can see it is consists of the target's name, the A button (Press A to do something), their status, their shield, their health outline... etc. This it the item that appears at the center top of the screen. So we should look at what uses this variable g_TargetGroup.
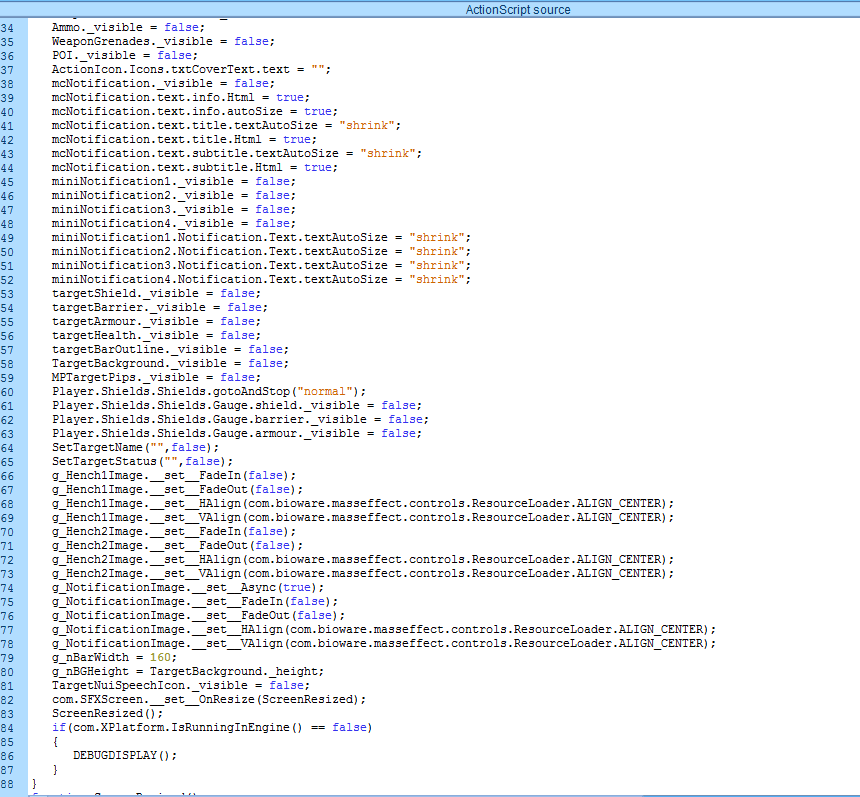
After looking through the rest of init(), we don't find it. The target display is not always shown on screen - which means something has to control when it turns on or off (or moves on or off screen). We will look for that in a moment, but looking through the rest of this functions lets us see that most screen elements are turned off at initialization time, with text shrinking to fit. Various objects are moved to their specific frames, and items are aligned such as the henchman images. You also see ScreenResized(), which we will cover in a moment.
We see at the bottom an if statement for running in engine - this means, if running in unreal engine is false, debug the display. This is an interesting feature as it will typically cycle through everything on screen so a developer could see where items are placed in flash player. If you change the false to true, you can most times see everything that is on the stage. I found the actual precise ME2 HUD healthbars are there, rather than the blocky ones ME3 uses by making the debug function run.
ScreenResized()
To find our missing variable g_TargetGroup, we search through the file for this variable. Our first hit will be in ScreenResized(), a method that is automatically called when the screen is resized or manually called. If you are doing scaling work, you will find a lot of your work will be done in this method, as it controls snapping of items to the sides of the screen.
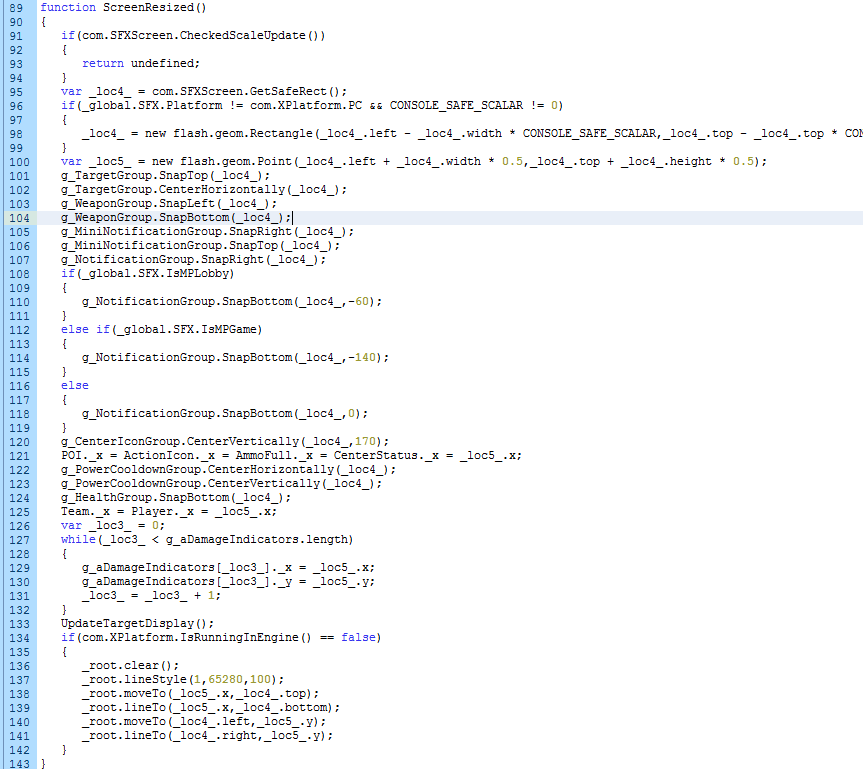
At the beginning (line 91), we can see a function that checks if this function even needs to run in the SFXScreen class, something we should check. Open the SFXScreen class under the scripts folder (you will need to drill into a few folders to find this).
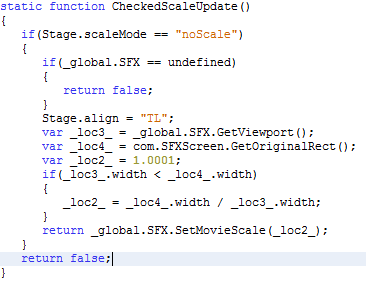
It returns false if the stage scaling mode is antyhing except noScale. This SWF currently is running with noScale (the default), so it checks if it has a reference to the SFX variable. I beleive this variable is a way to reference some information from Unreal Engine 3. We set the stage alignment to the top left, get the viewport (physical game viewing area) as well as the rectangle that defines this SWF's stage. The viewport for a 1080p monitor would be 1920x1080, so we set a default scaling value of 1.0001. I imagine you can't set a scaling value of 1 for some reason (it would be pointless, maybe a division by zero). If the width of the viewport is less than the width of the stage, it scales the UI down to fit - for example, if you are playing on a 800x600 monitor (which is not as wide as the required 1280px width). I am unsure what the method returns, but we can assume it will return what we need.
As we can now see back in the original screenResized() method, the game gets a safe screen rectangle. On PC, this is the same as the stage size. On consoles, we can see it will make a smaller rectangle that is safe from overscan by cutting off a % on each side. This is why the UI looks really goofy on consoles with everything moved in from the sides of the screen. loc5 here is the center of the screen, as a point value. We then snap the groups of objects to different areas, such as the target group we are looking for to the top center. The weapon goes bottom left, with the notifications (credits, medigel) going to the top right, and the main notification group going to the right.
We can see code for seeing if this is MP or not, and changing how the notification group moves based on it. If we are in MP lobby, it snaps to the bottom, with an offset of -60 (60 upwards, as this is a vertical snap). I am fairly sure this is in px, not twips. If we are in the match, it movse farther up, by 140, so it won't overlap the killfeed. If we are in singleplayer, it just snaps to the bottom.
The rest of this example is not yet finished...
Example 2: Adding keyboard control to the MP Store Interface
MP Store SWF File for following along (save as)
This example is not done. Additionally, adding keyboard controls to UIs that don't support it may not be possible after researching and writing this guide.
I have had a user request information on how to do this, so we will go through the steps to additional input to the interfaces. This is a curious one, as some interfaces (such as the main menu) respond to keyboard input (arrow keys) but not others (enter key). I am unsure why actual keyboard support was not fully implemented.
Popping open the MPStore SWF in JPEXs, we will go to the scripts/frame 1/DoAction script. We can quickly see that there is nothing really here, so this is almost certainly a screens based SWF.
We look for screens in scripts/__Packages/screens. Sure enough, we can see an MPStore folder here with different object classes. The one we are most likely looking for is the main interface, which typically has the name of the UI you would expect here (MPStore). So now we pop that open.
SWF Script Layout
Before we dive into editing the P-code, we are going to go through the decompiled actionscript source and get familiar with what we are dealing with. At the top of this script we can see we are enclosed in an object class, which means we will run only once instantiated or methods are called. At the top, we can also see some variable declarations.
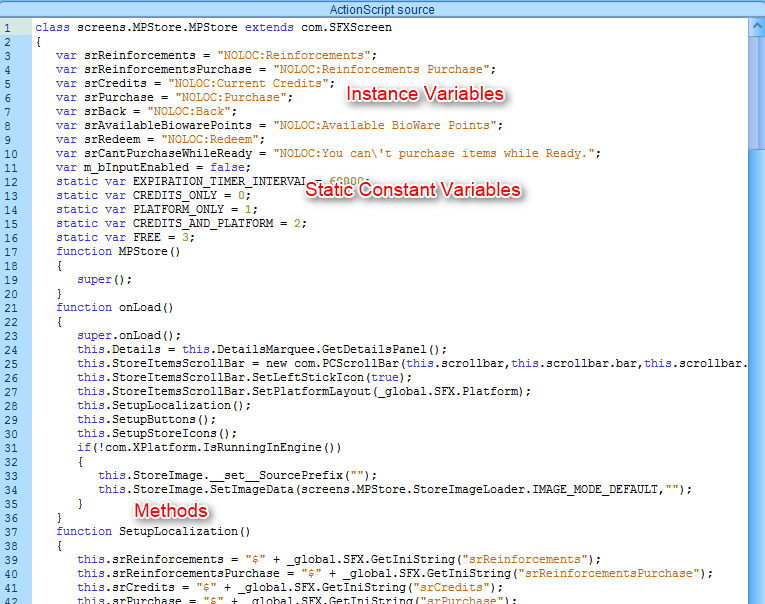
These variables up at the top that start with sr are String References, which mean they will take a string ID and load it from the game. This will provide localized text depending on the users language. As you can see above, they are preloaded with NOLOC, which means no localization. These are placeholders as they will be overridden at runtime (see the method SetupLocalization), but they can make your life a lot easier if you are trying to determine what a block of code is doing by looking at its surrounding variables.
Sometimes at the bottom of the file you can also find more declarations of variables, as well as some code that runs when the class is instantiated. This happens more often in the frame1 SWFs rather than screens based ones.
Finding the input assignments function
Finding the exact piece of code you need to edit can sometimes be a bit tricky. You will have to either manually scan the file for what you are looking for (something that assigns inputs to actions), or know a good search term for what you want in order to find what you want to edit. In this instance, we are looking to "setup" controls, so searching for the word Setup will take us to the function. We could also see from onLoad() there is a this.SetupButtons() method, which holds the information we want.
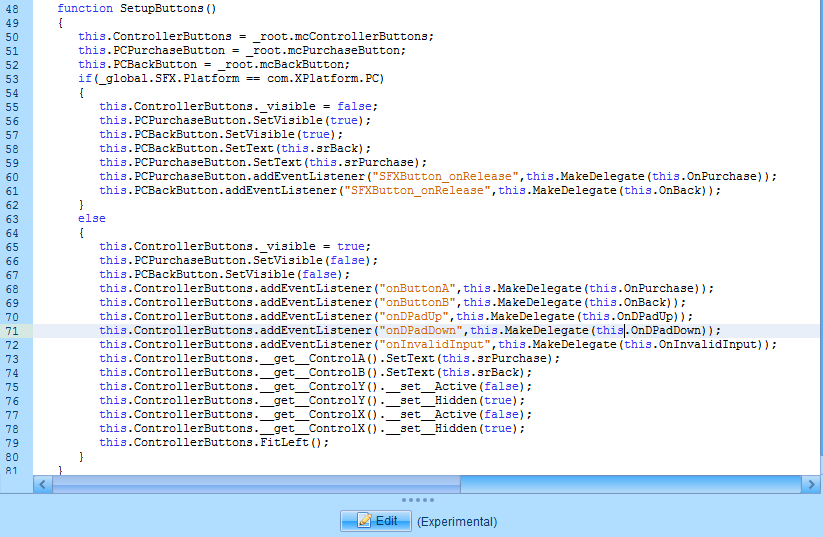
This looks promising. As we can see here, if the SFX Platform is PC, we load the top block of setup code, otherwise we set up the UI and controls using the bottom block. This is exactly how the controller mod is done - almost all interfaces simply change the platform IDs so when the game tells the SWF what platform it is, it points to XBOX or PS3 rather than PC. Some UIs for that mod require additional edits.
We can see the console interfaces have a way to scroll the menu with direct inputs - onDPadUp, onPadDown, which don't exist in the PC version. On PC, we have to use the mouse. We're here to change that. So we're going to have to edit the code in the top if statement to include additional input listeners for keyboards keys up, down, and enter.
But how do I do that?
Good question, as I researched how to do it, I realized it may not be possible...! The content remains as it contains useful info.
Example 3: Stripping and rewriting code
Old Controller Support Galaxy Map SWF File for following along (save as)
This example is complete from start to finish!
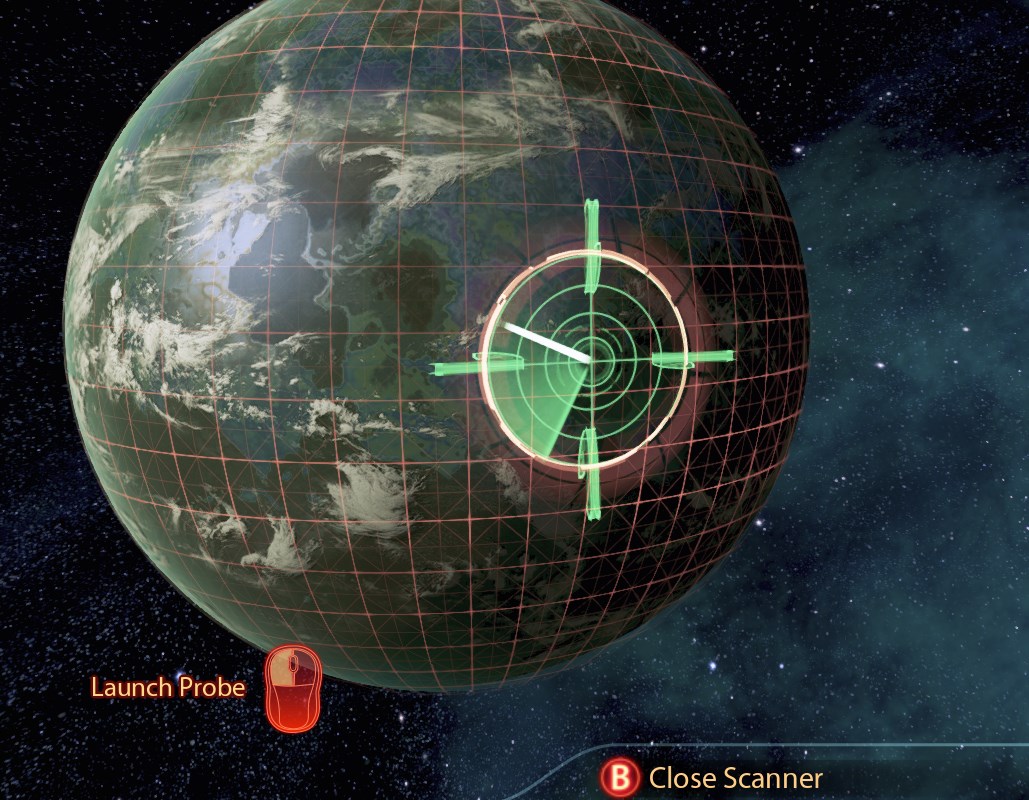
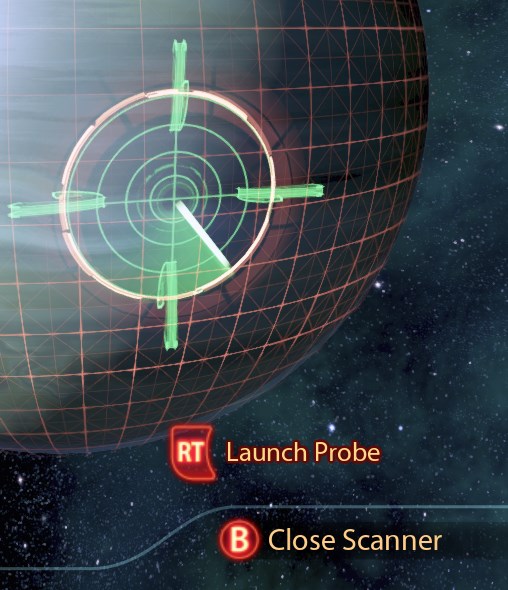
I was working on making the galaxy map show the correct button when you are in the probing screen. Somehow, the file I have in the controller mod works, but an optimized version of this GUI doesn't work. It's driving me mad! I can't get it to work, even though I set things to the same. It should just work! But I always get this screen:
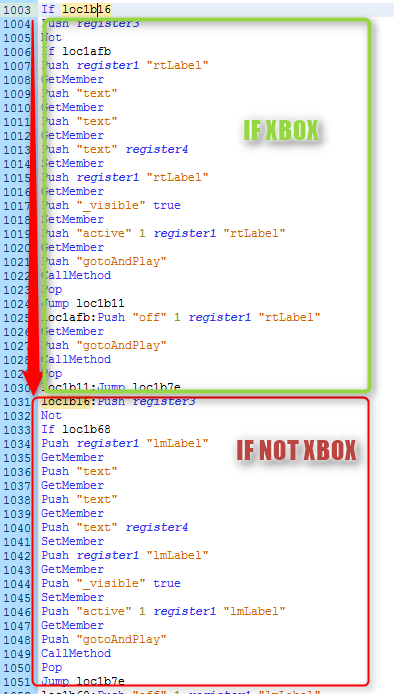
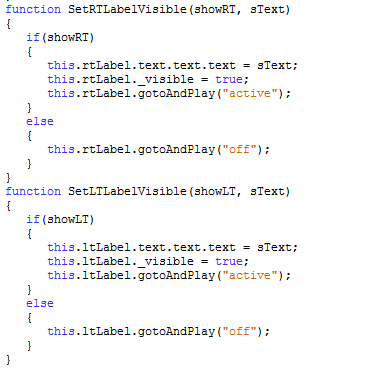
In instances like this, sometimes it is just better to brute force the UI to show what you want, by removing the alternate option you don't want. In this case, there is methods ShowLT and ShowRT, which detect the platform and show the mouse or triggers. Even though I changed the platform to be XBox, it still shows PC, so its time to gut out the PC code. While this example may not be applicable to much outside of controller mod support, this method of cutting out code you don't want executing is applicable to just about anywhere.
Popping open the galaxy map GUI, I can see the following code:
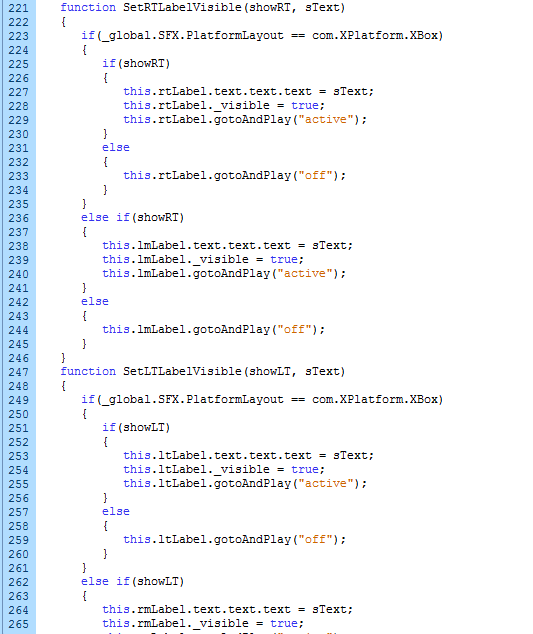
While this may seem a bit strange, it seems that it only shows triggers if the platform is xbox. I don't really understand how this works on PS3, maybe it has its own version of this GUI. PS3 was kind of an afterthought for this game, with the primary development seeming to be Xbox and PC. Now, even though I've set the platform, somehow it is still executing the code blocks related to lmLabel (left mouse label). We want to entirely remove the enclosing if statement, and also gut the two enclosing else statements as they only can make it show the mouse icon.
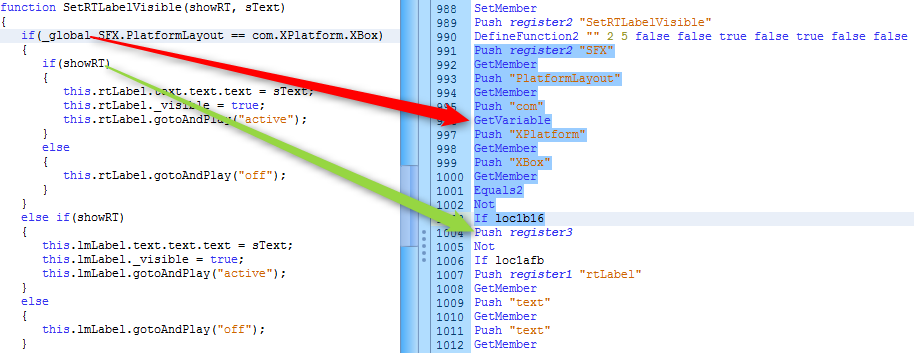
We first click on a piece of the text in the if statement - in this case, I did the word PlatformLayout, and the P-Code source should now scroll to the corresponding disassembly.
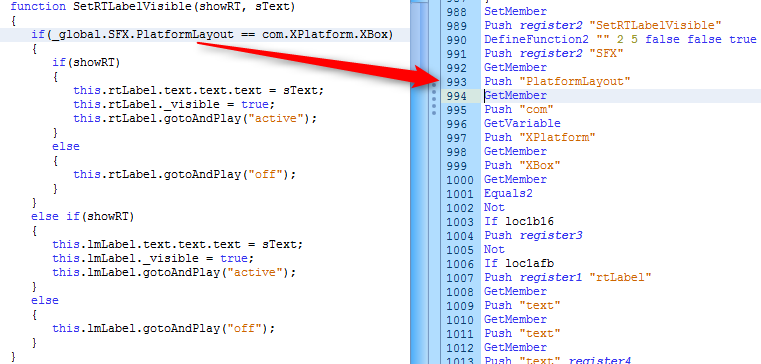
We can see in the P-Code on the right, it is pushing items onto the stack and getting members of the top stack item. In this instance, this is what happens at line 991 as the code executes:
- Push SFX onto the stack, and get the top stack item member from the next item on the stack (since there is nothing on it, it is __global. So now we have __global.SFX on the top of the stack.
- Push PlatformLayout onto the stack, and get the top of the stack item as a member variable from the next item on the stack. So this would translate to SFX.PlatformLayout. So now we have __global.SFX.PlatformLayout on the top of the stack.
- Push com onto the stack, and get the variable. This assembly instruction acts differently by only popping one item off the stack, rather than getmember's two. This is an important distinction as we are not looking at the items already on the stack before com. So at this point, we have pushed __global.SFX.PlatformLayout onto the stack, and now we have a new object being pushed onto it, the object represented by com variable. So there are now two objects on the stack.
- Push XPlatform onto the stack, and get the top of the stack item as a member variable from the next item on the stack. So this would translate to com.XPlatform. So now we have __global.SFX.PlatformLayout on the bottom of the stack, with com.XPlatform sitting on it.
- Push XBox onto the stack, and get the top of the stack item as a member variable from the next item on the stack. So this would translate to com.XPlatform.XBox. So now we have __global.SFX.PlatformLayout on the bottom of the stack, with com.XPlatform.XBox sitting on it. Two objects.
At this point we are no longer pushing items onto the stack and retrieving values. Our next order of business is to run the instruction equals2. Using our ActionScript reference guide, we can see the defintion of this instruction is ActionEquals2 is similar to ActionEquals, but ActionEquals2 knows about types. We can also see how it acts:
- Pops arg1 off the stack.
- Pops arg2 off the stack.
- Pushes the return value to the stack.
So this instruction will pop com.XPlatform.XBox off the stack, then pop __global.SFX.PlatformLayout off the stack and compare them. These items are both integers. Once the comparison is complete, it will push it only one item back onto the stack, the result of the comparison.
Not
Next we have the not command. This is simply an inversion instruction - it will pop the stack and invert the boolean value. So if it is xbox (true), it is now not xbox (false). This may make no sense to a human but this is typically an optimization technique by compilers.
Equals2
Finally, we have an if <LOCATIONLABEL> statement. It pops the stack, converts the value to a boolean (true/false), and if the value popped was true, will go to the LOCATIONLABEL in the P-Code. Location labels are pieces of text starting with :loc followed by some hex. This is a JPEXs disassembly convenience, as the real value is actually jump offsets. JPEXs when saving the file will recalculate these for you, making your life a lot less miserable. Click on a label or a If LocationLabel to highlight the matching labels. Sometimes you will find many items If LocationLabels point to a single location label, such as in a switch statement.
Wow! That's confusing!
Wow, that was a lot of technical mumbo jumbo, right? Well yes, it is - but its critical to know this, as you will often find nested if statements, which can get REALLY UGLY in P-Code. Once you get the hang of this stack pushing and popping though, its not too bad. You will manually have to calculate whats happening sometimes to figure out how the disassembled actionscript is resolved so you know what instructions to gut. At this point, we already know the code we have manually evaluated is going to get gutted, as its an if statement checking for XBOX platform. But we can't gut it yet - we need to also gut the wrapping code or the disassembled actionscript will be pretty much unreadable, which makes it way harder to continue.
If Statement Jumps
So now we know how this top part of the if statement P-Code works, so we can look at the P-Code and see what chunks correspond to what. Here's a picture showing it.
The IF NOT XBOX part continues beyond the image. Note the final part of IF XBOX is Jump loc1b7e - Once the IF XBOX code executes, its going to jump past the IF NOT XBOX code block to another label.
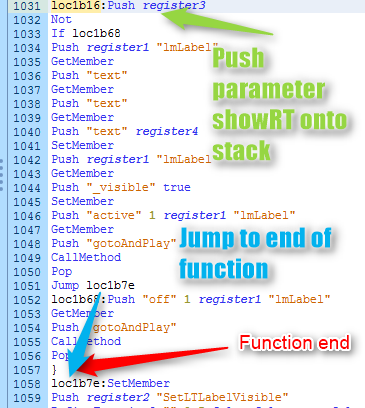
At the bottom here, we can see loc1b7e - the same place that chunk will jump to. Which is beyond the end of the function (a matching } to the opening { on the DefineFunction 2 line). In this image, make sure you note the line numbers as they aren't a continuation of each other. The bottom image here is the full IF NOT XBOX code block.
To be a bit more speedy about what's going on here, it's pushing register 3 (showRT paramater - I am unsure how it chooses what registers function parameters go into), inverting it, and then checking the value. If it's true, it branches to line 1052 it turns off the left mouse button using a gotoAndPlay. Otherwise, it continues to line 1034 and turns on the left mouse label and makes it visible. It then jumps to the same location as the end of IF XBOX jumps to. A thing to note here is there is no jump at the end of this if true block (line 1056), as the next instruction is already this location. At this point, the function is over.
Gutting the code
So now we know how the function works - we need to eliminate some of those equals and their stack code. We have to do this in one save operation or it'll get pretty hard to read. So, using our understanding of this code block:
- We know the P-Code at the beginning of the function needs to be removed as it sets up an IF PLATFORM == XBOX check
- We know the P-Code after the IF XBOX block can be removed (IF NOT XBOX, IF ShowRT)
- We know the P-Code after the IF NOT XBOX, IF ShowRT can be removed as it's code related to the left mouse button
Lets get to it. At this point I would recommend copying the entire contents of the P-Code window to a text file like notepad++ or sublime, as restoring will be much easier, because you will make mistakes.
The P-Code on the right corresponds to the If Statement at the top of this function. We can delete this section. This leaves the remaining else if and else statements below the IF XBOX block that must also be removed or will result in invalid code.
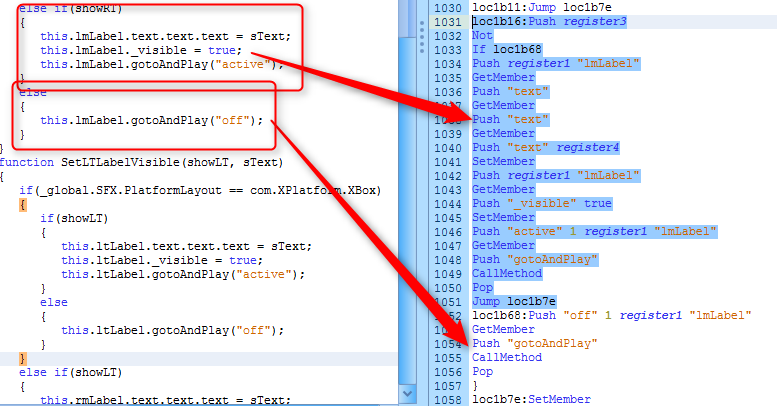
We can delete these two sections as they are for the if else (mouse) and just else (mouse, but off). Neither of these pertain to controller UI, so they are eliminated.
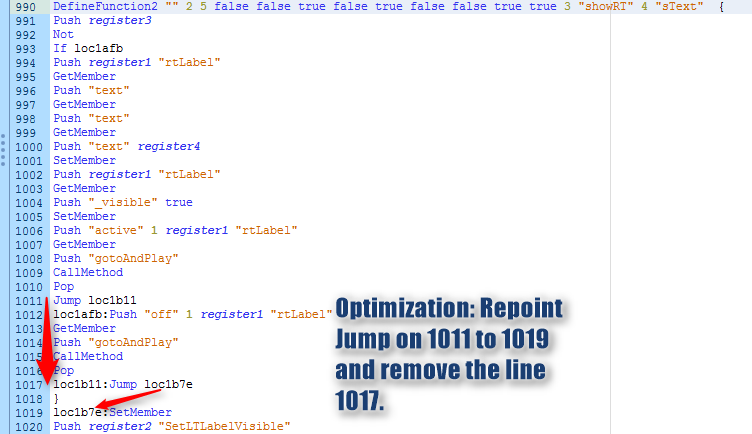
At this point we have cut out all the relevant code, but one item remains - a jump statement at the end of the function, pointing to right after the function. Technically this is OK, but to be optimization correct we should remove it, and repoint anything pointing to this label to the destination of the label, which is the next instruction. So we will delete the final jump before the end of the function, and then update the jump statement that pointed to this with the label loc1b7e.
Once we repoint the jump statement so it points to the first instruction outside of the function, we have finished our edits to the P-Code of this function.
Now click save at the bottom of the P-Code editor, and your changes will be applied (not saved to disk) and it will attempt to decompile your code again. Let's take a look!
In the above picture, I have applied what we did to both functions - they are nearly identical - and tada, it turned out exactly how we wanted. And now, we inject it, and test it...
Works great. Now I can strip out code that isn't useful for my needs and only execute what I need.